
Lesson 12: Deep Learning with the OpenCV DNN Module
 Viet-Anh Nguyen
OpenCV's dnn module lets you load and run pre-trained deep learning models from popular frameworks — including ONNX, TensorFlow, Caffe, and PyTorch (via ONNX export) — without needing those frameworks installed at inference time. In this lesson we'll use the latest YOLO26 model via the Ultralytics Python API for the cleanest experience, and show the pure OpenCV DNN path with YOLO11 ONNX for zero-dependency deployment.
1. Supported Model Formats
| Framework | How to load |
|---|---|
| ONNX | cv2.dnn.readNetFromONNX() |
| TensorFlow | cv2.dnn.readNetFromTensorflow() |
| Caffe | cv2.dnn.readNetFromCaffe() |
| Darknet (YOLO) | cv2.dnn.readNetFromDarknet() |
| PyTorch | Export to ONNX, then readNetFromONNX() |
OpenCV 4.x note: ONNX is the recommended format. Most frameworks (PyTorch, TensorFlow, Keras) can export to ONNX, and OpenCV's ONNX support is the most actively maintained path.
2. YOLO Model Landscape (2026)
| Model | mAP (COCO) | NMS-free | Speed (CPU) | Notes |
|---|---|---|---|---|
| YOLO26x | 57.5 | Yes | 43% faster | Latest (Jan 2026). Recommended. |
| YOLO26l | 55.9 | Yes | 43% faster | Good balance of speed and accuracy |
| YOLO26n | 39.8 | Yes | Fastest | Nano variant, edge devices |
| YOLO11x | 54.7 | No | Baseline | Previous stable, still widely deployed |
| YOLO11n | 39.5 | No | Fast | Previous nano variant |
| YOLO12 | — | — | — | Skip — training instability, not stable |
Key YOLO26 improvements:
- NMS-free: Outputs end-to-end predictions. No post-processing (Non-Maximum Suppression) step needed.
- 43% faster on CPU than YOLO11 at equivalent accuracy.
- MuSGD optimizer during training for better convergence.
- Variants:
yolo26n/s/m/l/x.pt
3. The Blob Preprocessing Pipeline
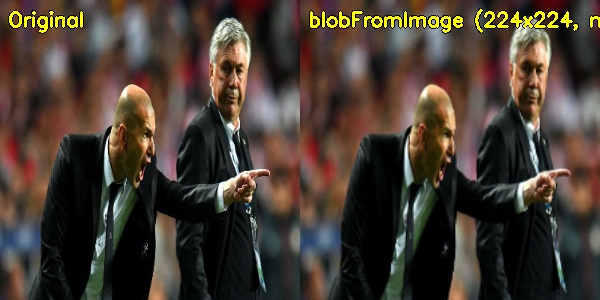
Before feeding an image to a DNN through OpenCV, you must convert it to a blob — a 4D tensor with shape (batch, channels, height, width):
import cv2
import numpy as np

img = cv2.imread("image.jpg")

# cv2.dnn.blobFromImage parameters:
# - image: input (BGR)
# - scalefactor: pixel value scale (1/255.0 normalizes to [0, 1])
# - size: spatial size expected by the model
# - mean: mean subtraction values (R, G, B) — model-specific
# - swapRB: swap R and B (converts BGR → RGB if True)
# - crop: whether to center-crop after resize
blob = cv2.dnn.blobFromImage(
    img,
    scalefactor=1.0 / 255.0,
    size=(640, 640),
    mean=(0, 0, 0),
    swapRB=True,
    crop=False
)
print(f"Blob shape: {blob.shape}")  # (1, 3, 640, 640)
This step is handled automatically when using the Ultralytics Python API — you only need it when running models directly through OpenCV DNN.
4. Object Detection with YOLO26 (Ultralytics API)
The Ultralytics API is the simplest and most complete way to use YOLO26. It handles preprocessing, inference, and post-processing automatically.
Install
pip install ultralytics
Basic inference
from ultralytics import YOLO
import urllib.request
import cv2
import numpy as np

# Download a test image
url = "https://ultralytics.com/images/bus.jpg"
urllib.request.urlretrieve(url, "bus.jpg")

# Load YOLO26 nano (downloads automatically on first run)
model = YOLO("yolo26n.pt")

# Run inference — YOLO26 is NMS-free, no post-processing needed
results = model("bus.jpg")

# Parse results
result = results[0]
for box in result.boxes:
    cls_id = int(box.cls[0])
    conf = float(box.conf[0])
    x1, y1, x2, y2 = map(int, box.xyxy[0])
    label = result.names[cls_id]
    print(f"{label}: {conf:.2f}  [{x1},{y1} → {x2},{y2}]")

# Expected output (bus.jpg):
# person: 0.89  [...]
# person: 0.87  [...]
# person: 0.84  [...]
# person: 0.81  [...]
# person: 0.79  [...]
# person: 0.72  [...]
# bus: 0.95  [...]
# car: 0.78  [...]
# car: 0.65  [...]
# → 6 persons, 1 bus, 2 cars detected
Annotate and display with OpenCV
from ultralytics import YOLO
import urllib.request
import cv2

url = "https://ultralytics.com/images/bus.jpg"
urllib.request.urlretrieve(url, "bus.jpg")

model = YOLO("yolo26n.pt")
results = model("bus.jpg")
result = results[0]

img = cv2.imread("bus.jpg")

for box in result.boxes:
    cls_id = int(box.cls[0])
    conf = float(box.conf[0])
    x1, y1, x2, y2 = map(int, box.xyxy[0])
    label = f"{result.names[cls_id]}: {conf:.2f}"

    cv2.rectangle(img, (x1, y1), (x2, y2), (0, 255, 0), 2)
    cv2.putText(img, label, (x1, y1 - 8),
                cv2.FONT_HERSHEY_SIMPLEX, 0.5, (0, 255, 0), 2)

cv2.imshow("YOLO26 Detection", img)
cv2.waitKey(0)
cv2.destroyAllWindows()
Why YOLO26 is NMS-free
Traditional YOLO models output many overlapping candidate boxes, requiring Non-Maximum Suppression (NMS) to filter duplicates. YOLO26 uses an end-to-end detection head that directly predicts a fixed set of unique detections — eliminating NMS entirely:
# YOLO11 (old way) — requires NMS post-processing
indices = cv2.dnn.NMSBoxes(boxes, confidences, conf_thresh, nms_thresh)
results = [detections[i] for i in indices.flatten()]

# YOLO26 via Ultralytics (new way) — no NMS step
results = model("image.jpg")  # already end-to-end, ready to use
This makes YOLO26 significantly simpler to deploy and removes a key latency bottleneck on CPU.
Using a different YOLO26 variant
from ultralytics import YOLO

# Choose by accuracy/speed tradeoff
model_nano = YOLO("yolo26n.pt")   # fastest, smallest
model_small = YOLO("yolo26s.pt")
model_medium = YOLO("yolo26m.pt")
model_large = YOLO("yolo26l.pt")
model_xlarge = YOLO("yolo26x.pt") # most accurate (mAP 57.5 on COCO)
5. YOLO26 ONNX Export
Export YOLO26 to ONNX once to use it in any runtime — including OpenCV DNN, ONNX Runtime, or TensorRT.
from ultralytics import YOLO

model = YOLO("yolo26n.pt")

# Export to ONNX
model.export(format="onnx")
# Creates: yolo26n.onnx
# Or from the command line
yolo export model=yolo26n.pt format=onnx
YOLO26 ONNX output format: Because YOLO26 is NMS-free, its ONNX output is already a clean set of end-to-end predictions — no NMS post-processing needed at the ONNX consumer side either.
6. OpenCV DNN with YOLO11 ONNX
When you need pure OpenCV deployment with no Ultralytics dependency, use YOLO11 ONNX through cv2.dnn. This is useful for embedding in C++ applications or constrained environments.
Export YOLO11 to ONNX (run once)
pip install ultralytics
yolo export model=yolo11n.pt format=onnx imgsz=640 opset=12
# Creates: yolo11n.onnx
Run inference with OpenCV DNN
import cv2
import numpy as np
import urllib.request

# Download test image
url = "https://ultralytics.com/images/bus.jpg"
urllib.request.urlretrieve(url, "bus.jpg")

CONFIDENCE_THRESHOLD = 0.5
NMS_THRESHOLD = 0.4
INPUT_SIZE = 640

# COCO class names (80 classes)
COCO_CLASSES = [
    "person", "bicycle", "car", "motorcycle", "airplane", "bus", "train",
    "truck", "boat", "traffic light", "fire hydrant", "stop sign",
    "parking meter", "bench", "bird", "cat", "dog", "horse", "sheep",
    "cow", "elephant", "bear", "zebra", "giraffe", "backpack", "umbrella",
    "handbag", "tie", "suitcase", "frisbee", "skis", "snowboard",
    "sports ball", "kite", "baseball bat", "baseball glove", "skateboard",
    "surfboard", "tennis racket", "bottle", "wine glass", "cup", "fork",
    "knife", "spoon", "bowl", "banana", "apple", "sandwich", "orange",
    "broccoli", "carrot", "hot dog", "pizza", "donut", "cake", "chair",
    "couch", "potted plant", "bed", "dining table", "toilet", "tv",
    "laptop", "mouse", "remote", "keyboard", "cell phone", "microwave",
    "oven", "toaster", "sink", "refrigerator", "book", "clock", "vase",
    "scissors", "teddy bear", "hair drier", "toothbrush",
]

net = cv2.dnn.readNetFromONNX("yolo11n.onnx")

def detect_yolo11(image):
    h, w = image.shape[:2]
    blob = cv2.dnn.blobFromImage(
        image, 1 / 255.0, (INPUT_SIZE, INPUT_SIZE), swapRB=True, crop=False
    )
    net.setInput(blob)
    # YOLO11 output shape: (1, 84, 8400) — 4 box coords + 80 class scores
    outputs = net.forward()[0].T  # → (8400, 84)

    x_scale = w / INPUT_SIZE
    y_scale = h / INPUT_SIZE

    boxes, confidences, class_ids = [], [], []
    for row in outputs:
        scores = row[4:]
        class_id = int(np.argmax(scores))
        confidence = float(scores[class_id])
        if confidence < CONFIDENCE_THRESHOLD:
            continue
        cx, cy, bw, bh = row[:4]
        x1 = int((cx - bw / 2) * x_scale)
        y1 = int((cy - bh / 2) * y_scale)
        boxes.append([x1, y1, int(bw * x_scale), int(bh * y_scale)])
        confidences.append(confidence)
        class_ids.append(class_id)

    # YOLO11 still requires NMS (not NMS-free)
    indices = cv2.dnn.NMSBoxes(boxes, confidences, CONFIDENCE_THRESHOLD, NMS_THRESHOLD)
    if len(indices) == 0:
        return []
    return [(boxes[i], confidences[i], class_ids[i]) for i in indices.flatten()]


img = cv2.imread("bus.jpg")
detections = detect_yolo11(img)

print(f"Detected {len(detections)} objects")
# Expected: ~9 detections (6 persons, 1 bus, 2 cars)

for (x, y, bw, bh), conf, class_id in detections:
    label = f"{COCO_CLASSES[class_id]}: {conf:.2f}"
    cv2.rectangle(img, (x, y), (x + bw, y + bh), (0, 255, 0), 2)
    cv2.putText(img, label, (x, y - 8),
                cv2.FONT_HERSHEY_SIMPLEX, 0.5, (0, 255, 0), 2)

cv2.imshow("YOLO11 (OpenCV DNN)", img)
cv2.waitKey(0)
cv2.destroyAllWindows()
When to use OpenCV DNN vs Ultralytics API:
- Use Ultralytics API when you want the simplest code, latest models, and automatic updates.
- Use OpenCV DNN when you need zero Python-ML dependencies, are deploying to C++, or are packaging a slim runtime for an edge device.
7. Image Classification with MobileNetV2 (ONNX)
OpenCV DNN also handles classification models cleanly. Here is MobileNetV2 as an example.
Export from PyTorch (run once)
import torch
import torchvision.models as models

model = models.mobilenet_v2(weights="DEFAULT")
model.eval()

dummy = torch.randn(1, 3, 224, 224)
torch.onnx.export(
    model, dummy, "mobilenetv2.onnx",
    input_names=["input"], output_names=["output"],
    opset_version=12
)
Run inference
import cv2
import numpy as np
import urllib.request

# Download a close-up test image
url = "https://ultralytics.com/images/zidane.jpg"
urllib.request.urlretrieve(url, "zidane.jpg")

with open("imagenet_classes.txt") as f:
    classes = [line.strip() for line in f.readlines()]

net = cv2.dnn.readNetFromONNX("mobilenetv2.onnx")

img = cv2.imread("zidane.jpg")
blob = cv2.dnn.blobFromImage(
    img,
    scalefactor=1.0 / 255.0,
    size=(224, 224),
    mean=(0.485, 0.456, 0.406),
    swapRB=True,
    crop=False
)
net.setInput(blob)
outputs = net.forward().flatten()  # (1000,)

# Manual softmax + top-5
exp_scores = np.exp(outputs - outputs.max())
probs = exp_scores / exp_scores.sum()
top5 = probs.argsort()[-5:][::-1]

for idx in top5:
    print(f"{classes[idx]}: {probs[idx]*100:.2f}%")
# Expected (zidane.jpg): soccer player, jersey, person — top ImageNet classes
8. Face Detection with DNN
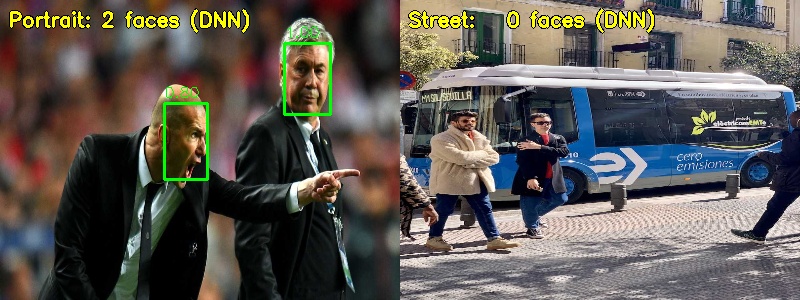
OpenCV ships with a ready-to-use SSD face detector based on ResNet-10:
import cv2
import numpy as np
import urllib.request

# Download a portrait test image
url = "https://ultralytics.com/images/zidane.jpg"
urllib.request.urlretrieve(url, "zidane.jpg")

# Download model files from:
# https://github.com/opencv/opencv/tree/master/samples/dnn/face_detector
net = cv2.dnn.readNetFromCaffe(
    "deploy.prototxt",
    "res10_300x300_ssd_iter_140000.caffemodel"
)

img = cv2.imread("zidane.jpg")
h, w = img.shape[:2]

blob = cv2.dnn.blobFromImage(
    cv2.resize(img, (300, 300)), 1.0, (300, 300),
    (104.0, 177.0, 123.0), swapRB=False
)
net.setInput(blob)
detections = net.forward()

face_count = 0
for i in range(detections.shape[2]):
    confidence = detections[0, 0, i, 2]
    if confidence < 0.5:
        continue
    face_count += 1
    box = detections[0, 0, i, 3:7] * np.array([w, h, w, h])
    x1, y1, x2, y2 = box.astype(int)
    cv2.rectangle(img, (x1, y1), (x2, y2), (0, 255, 0), 2)
    cv2.putText(img, f"{confidence:.2f}", (x1, y1 - 8),
                cv2.FONT_HERSHEY_SIMPLEX, 0.5, (0, 255, 0), 1)

print(f"Detected {face_count} face(s)")
# Expected: 2 faces detected in zidane.jpg

cv2.imshow("Face Detection", img)
cv2.waitKey(0)
cv2.destroyAllWindows()
9. GPU Acceleration
OpenCV DNN supports CUDA for GPU acceleration with a single backend change:
import cv2

net = cv2.dnn.readNetFromONNX("yolo11n.onnx")

# CUDA backend — requires OpenCV built with CUDA support
net.setPreferableBackend(cv2.dnn.DNN_BACKEND_CUDA)
net.setPreferableTarget(cv2.dnn.DNN_TARGET_CUDA)

# For FP16 on supported GPUs (Jetson Orin, RTX cards)
# net.setPreferableTarget(cv2.dnn.DNN_TARGET_CUDA_FP16)
The Ultralytics API also supports GPU inference:
from ultralytics import YOLO

model = YOLO("yolo26n.pt")

# Run on GPU (requires PyTorch with CUDA)
results = model("bus.jpg", device="cuda")

# Run on CPU explicitly
results = model("bus.jpg", device="cpu")
Check available backends at runtime:
print(cv2.getBuildInformation()) # Shows which backends are compiled in
10. Benchmarking Inference Speed
OpenCV DNN benchmark
import cv2
import numpy as np
import time
import urllib.request

url = "https://ultralytics.com/images/bus.jpg"
urllib.request.urlretrieve(url, "bus.jpg")

net = cv2.dnn.readNetFromONNX("yolo11n.onnx")
img = cv2.imread("bus.jpg")
blob = cv2.dnn.blobFromImage(img, 1 / 255.0, (640, 640), swapRB=True)
net.setInput(blob)

# Warmup
for _ in range(3):
    net.forward()

# Benchmark
N = 50
start = time.perf_counter()
for _ in range(N):
    net.forward()
elapsed = time.perf_counter() - start

print(f"YOLO11n (OpenCV DNN):")
print(f"  Average: {elapsed/N*1000:.1f} ms per frame")
print(f"  Throughput: {N/elapsed:.1f} FPS")
# Example output (modern CPU): ~35–60 ms/frame, ~17–29 FPS
Ultralytics benchmark
from ultralytics import YOLO

model = YOLO("yolo26n.pt")

# Built-in benchmark utility
model.benchmark(imgsz=640)
# Prints: YOLO26n CPU speed, mAP, model size table
Expected performance comparison (640×640, CPU, modern desktop)
| Model | Approx. inference (ms) | Approx. FPS |
|---|---|---|
| YOLO26n | ~20–30 ms | ~35–50 FPS |
| YOLO11n | ~35–55 ms | ~18–29 FPS |
| YOLO26x | ~150–250 ms | ~4–7 FPS |
| YOLO11x | ~250–400 ms | ~2–4 FPS |
Numbers vary significantly by CPU. YOLO26 is ~43% faster than YOLO11 at equivalent variants due to the NMS-free architecture and MuSGD-trained weights.
Conclusion
The OpenCV DNN module lets you deploy deep learning models without a heavy inference framework — ideal for edge and embedded systems. For new projects, YOLO26 with the Ultralytics API is the recommended approach: it is faster, NMS-free, and simpler to use. When you need zero ML-framework dependencies, YOLO11 ONNX through cv2.dnn remains a solid and well-understood path. In the final lesson, we'll combine all of this into a complete real-time multi-object tracking application.