
Lesson 04: Basic Image Processing
 Viet-Anh Nguyen
Image processing is the process of manipulating and analyzing digital images to improve their quality or extract useful information. In this lesson we cover the fundamental operations: reading, writing, displaying, and transforming images.
0. Download the Test Image
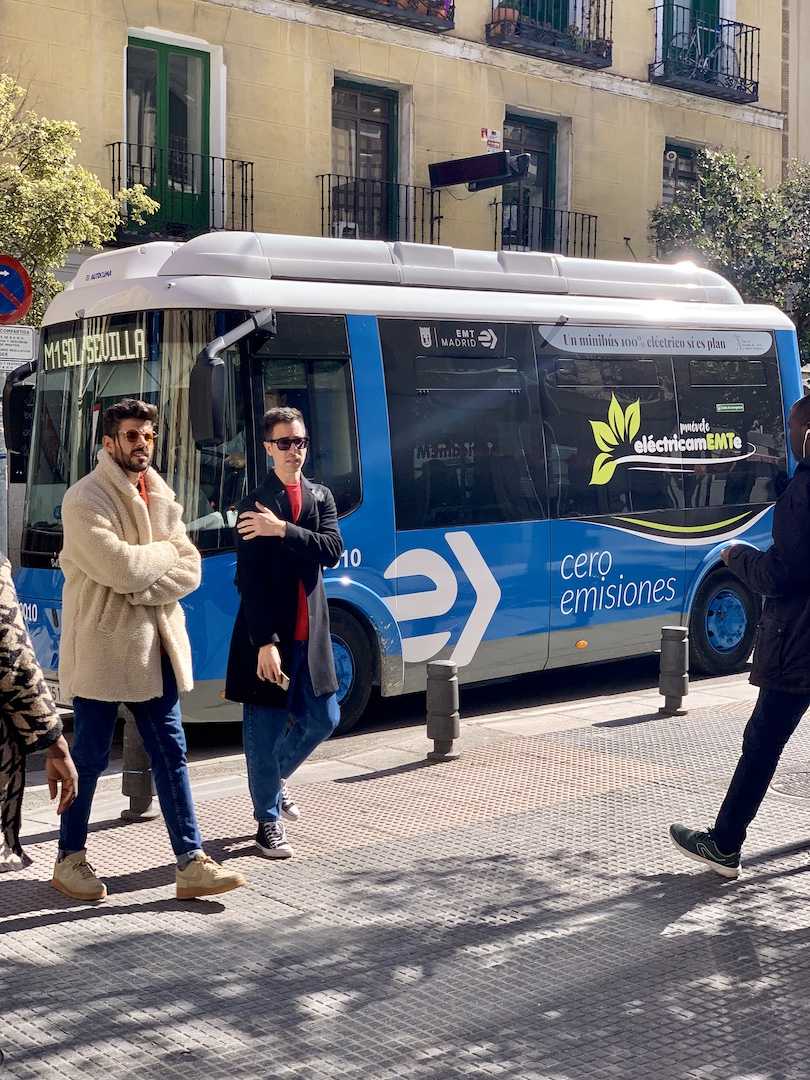
All examples in this lesson use the same image — a street scene with a bus, pedestrians, and cars from Ultralytics' public image library. Run this once at the start:
import urllib.request
import cv2

urllib.request.urlretrieve(
    "https://ultralytics.com/images/bus.jpg", "bus.jpg"
)
img = cv2.imread("bus.jpg")
print(f"Loaded: {img.shape}")  # (1080, 810, 3)  →  1080×810 px, BGR
1. Reading and Writing Images
Read and display
import cv2

img = cv2.imread("bus.jpg")

cv2.imshow("Bus Scene", img)
cv2.waitKey(0)
cv2.destroyAllWindows()
# Expected: a 810×1080 window opens showing the bus and pedestrians
cv2.imread() returns a NumPy array with shape (height, width, channels). If the file is not found it returns None — always check:
img = cv2.imread("bus.jpg")
if img is None:
    raise FileNotFoundError("Image not found — check the path")
Write to file
import cv2

img = cv2.imread("bus.jpg")
gray = cv2.cvtColor(img, cv2.COLOR_BGR2GRAY)

cv2.imwrite("bus_gray.jpg", gray)
print("Saved bus_gray.jpg")
# Expected: a grayscale JPEG written to disk, ~120 KB
2. Displaying Images
import cv2
import numpy as np

img = cv2.imread("bus.jpg")

# Side-by-side: original and grayscale
gray = cv2.cvtColor(img, cv2.COLOR_BGR2GRAY)
gray_bgr = cv2.cvtColor(gray, cv2.COLOR_GRAY2BGR)  # match channels for hconcat

side_by_side = cv2.hconcat([img, gray_bgr])
cv2.imshow("Original | Grayscale", side_by_side)
cv2.waitKey(0)
cv2.destroyAllWindows()
# Expected: left half is the color scene, right half is the same scene in grayscale
3. Manipulating Images
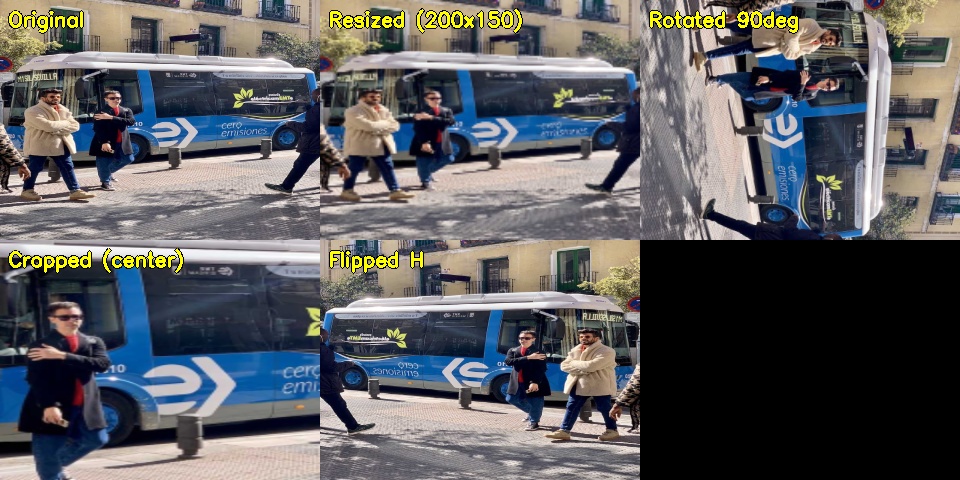
Resize
import cv2

img = cv2.imread("bus.jpg")
h, w = img.shape[:2]
print(f"Original: {w}×{h}")  # 810×1080

# Resize to fixed dimensions
small = cv2.resize(img, (400, 300))
print(f"Resized: {small.shape}")  # (300, 400, 3)

# Resize keeping aspect ratio — scale by 50%
half = cv2.resize(img, (0, 0), fx=0.5, fy=0.5)
print(f"Half size: {half.shape}")  # (540, 405, 3)

cv2.imshow("Original", img)
cv2.imshow("400×300", small)
cv2.imshow("50% scale", half)
cv2.waitKey(0)
cv2.destroyAllWindows()
# Expected: three windows — original large, squished small, and correctly proportioned half
Tip: Use
cv2.INTER_AREAwhen shrinking for best quality; usecv2.INTER_LINEARorcv2.INTER_CUBICwhen enlarging:small = cv2.resize(img, (400, 300), interpolation=cv2.INTER_AREA)
Rotate
import cv2

img = cv2.imread("bus.jpg")

rot_90  = cv2.rotate(img, cv2.ROTATE_90_CLOCKWISE)
rot_180 = cv2.rotate(img, cv2.ROTATE_180)
rot_ccw = cv2.rotate(img, cv2.ROTATE_90_COUNTERCLOCKWISE)

cv2.imshow("Original",   img)
cv2.imshow("90° CW",     rot_90)
cv2.imshow("180°",       rot_180)
cv2.imshow("90° CCW",    rot_ccw)
cv2.waitKey(0)
cv2.destroyAllWindows()
# Expected: bus appears sideways (90°), upside-down (180°), or mirrored sideways (CCW)
For arbitrary rotation angles, use cv2.getRotationMatrix2D():
import cv2

img = cv2.imread("bus.jpg")
h, w = img.shape[:2]
center = (w // 2, h // 2)

M = cv2.getRotationMatrix2D(center, angle=45, scale=0.8)
rotated = cv2.warpAffine(img, M, (w, h))

cv2.imshow("45° rotation", rotated)
cv2.waitKey(0)
cv2.destroyAllWindows()
# Expected: bus tilted 45° clockwise, scaled to 80%, with black corners
Crop
Cropping is just NumPy array slicing — img[y1:y2, x1:x2]:
import cv2

img = cv2.imread("bus.jpg")

# Crop out roughly the bus in the upper-right area
bus_crop = img[50:600, 0:500]

cv2.imshow("Full Scene", img)
cv2.imshow("Bus Crop",   bus_crop)
cv2.waitKey(0)
cv2.destroyAllWindows()
# Expected: second window shows just the front of the bus
Flip
import cv2
import numpy as np

img = cv2.imread("bus.jpg")

flip_h  = cv2.flip(img,  1)   # horizontal (mirror)
flip_v  = cv2.flip(img,  0)   # vertical (upside down)
flip_hv = cv2.flip(img, -1)   # both

row1 = cv2.hconcat([img,    flip_h])
row2 = cv2.hconcat([flip_v, flip_hv])
grid = cv2.vconcat([row1, row2])

# Scale down for display
display = cv2.resize(grid, (0, 0), fx=0.4, fy=0.4)
cv2.imshow("Flip Grid (original | H | V | HV)", display)
cv2.waitKey(0)
cv2.destroyAllWindows()
# Expected: 2×2 grid — top-left original, top-right mirrored, bottom-left upside-down, bottom-right both
4. Pixel-Level Access
import cv2
import numpy as np

img = cv2.imread("bus.jpg")

# Read a single pixel (row=100, col=200)
pixel = img[100, 200]
print(f"Pixel BGR at (100, 200): {pixel}")  # e.g. [143 171 185]

# Draw a red rectangle around the bus area
annotated = img.copy()
cv2.rectangle(annotated, (0, 50), (500, 600), color=(0, 0, 255), thickness=3)
cv2.imshow("Annotated", annotated)
cv2.waitKey(0)
cv2.destroyAllWindows()
# Expected: a red box drawn over the bus area
5. Conclusion
You now know how to load any image from disk (or a URL), inspect it, display it, write it back, and apply the core geometric transforms. These operations are the building blocks for every CV pipeline. Next up: color spaces — how to work with color beyond simple RGB.