
Lesson 3 of 10
Lesson 03: Face Detection & Landmarks
4 min read Viet-Anh Nguyen
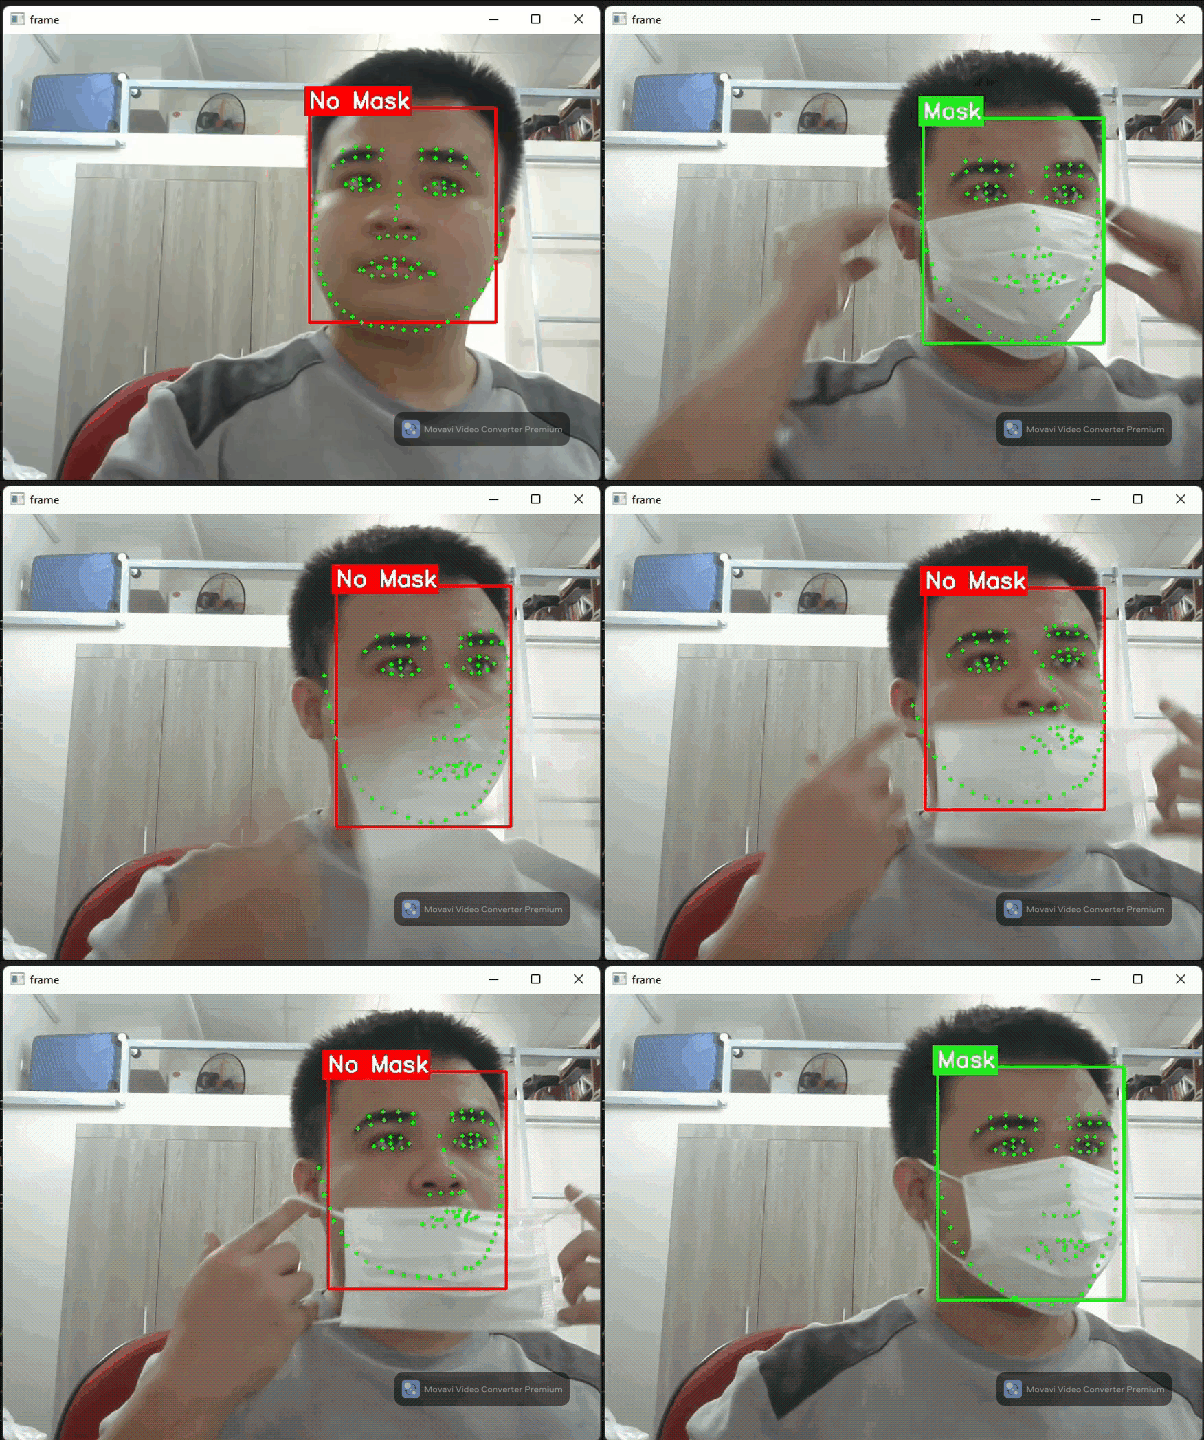
Viet-Anh NguyenFaceDetectorFlow is DaisyKit's most full-featured flow. It chains two models together:
- YOLO Fastest — a lightweight face detector that also predicts whether the person is wearing a face mask
- PFLD (Practical Facial Landmark Detector) — a 98-keypoint landmark regressor that runs on each detected face crop

Configuration
import json
from daisykit.utils import get_asset_file

config = {
    "face_detection_model": {
        "model": get_asset_file(
            "models/face_detection/yolo_fastest_with_mask/yolo-fastest-opt.param"
        ),
        "weights": get_asset_file(
            "models/face_detection/yolo_fastest_with_mask/yolo-fastest-opt.bin"
        ),
        "input_width": 320,
        "input_height": 320,
        "score_threshold": 0.7,   # lower = detect more faces (more false positives)
        "iou_threshold": 0.5,     # NMS overlap threshold
        "use_gpu": False,
    },
    "with_landmark": True,        # set False to skip landmark regression (faster)
    "facial_landmark_model": {
        "model": get_asset_file("models/facial_landmark/pfld-sim.param"),
        "weights": get_asset_file("models/facial_landmark/pfld-sim.bin"),
        "input_width": 112,
        "input_height": 112,
        "use_gpu": False,
    },
}
Key parameters:
| Parameter | Effect |
|---|---|
score_threshold | Min confidence to accept a detection. Lower = more detections. |
iou_threshold | NMS threshold. Lower = suppress more overlapping boxes. |
with_landmark | Whether to run PFLD landmark regression on each face crop. |
input_width/height | Detector input size. Larger = more accurate, slower. |
Real-Time Webcam Demo
import cv2
import json
import daisykit
from daisykit.utils import get_asset_file, to_py_type

config = { ... }  # as above

flow = daisykit.FaceDetectorFlow(json.dumps(config))

cap = cv2.VideoCapture(0)

while True:
    ret, frame = cap.read()
    if not ret:
        break

    # DaisyKit expects RGB
    rgb = cv2.cvtColor(frame, cv2.COLOR_BGR2RGB)

    faces = flow.Process(rgb)
    flow.DrawResult(rgb, faces)

    display = cv2.cvtColor(rgb, cv2.COLOR_RGB2BGR)
    cv2.imshow("Face Detection + Landmarks", display)

    if cv2.waitKey(1) & 0xFF == ord("q"):
        break

cap.release()
cv2.destroyAllWindows()
Reading Face Data
from daisykit.utils import to_py_type

rgb = cv2.cvtColor(frame, cv2.COLOR_BGR2RGB)
faces = flow.Process(rgb)
faces_py = to_py_type(faces)

for i, face in enumerate(faces_py):
    x, y, w, h = face["x"], face["y"], face["w"], face["h"]
    conf = face["confidence"]
    mask_prob = face["wearing_mask_prob"]

    print(f"Face {i}: bbox=({x},{y},{w},{h})  conf={conf:.2f}  mask={mask_prob:.2f}")

    if "landmark" in face:
        landmarks = face["landmark"]  # list of {"x": float, "y": float}
        print(f"  {len(landmarks)} landmark points")
        # Example: landmarks[30] is approximately the nose tip
        nose = landmarks[30]
        print(f"  Nose tip: ({nose['x']:.1f}, {nose['y']:.1f})")
Running on a Static Image (no webcam)
import cv2
import json
import urllib.request
import daisykit
from daisykit.utils import get_asset_file, to_py_type

urllib.request.urlretrieve("https://ultralytics.com/images/zidane.jpg", "zidane.jpg")

config = { ... }  # as above
flow = daisykit.FaceDetectorFlow(json.dumps(config))

img = cv2.imread("zidane.jpg")
rgb = cv2.cvtColor(img, cv2.COLOR_BGR2RGB)

faces = flow.Process(rgb)
print(f"Detected {len(faces)} face(s)")

flow.DrawResult(rgb, faces)
result = cv2.cvtColor(rgb, cv2.COLOR_RGB2BGR)
cv2.imwrite("face_result.jpg", result)
# Expected: image with green bounding boxes, landmark dots, and mask/no-mask label
Disabling Landmarks for Speed
When you only need bounding boxes (e.g., counting faces, access control), skip landmark regression:
config = {
    "face_detection_model": { ... },
    "with_landmark": False,   # skip PFLD — ~2x faster
}
flow = daisykit.FaceDetectorFlow(json.dumps(config))
Applications
- Smart attendance systems — detect and log faces without storing biometrics
- COVID-19 safety cameras — alert when a person is not wearing a mask
- AR filters — use landmark positions (eyes, nose, mouth) to place virtual objects
- Head pose estimation — derive 3D head orientation from 2D landmark positions
Conclusion
FaceDetectorFlow chains two models into a single, concurrent pipeline — you call Process() once and get both face bounding boxes and 68 landmark points. In the next lesson we switch to body analysis with human pose estimation using MoveNet.