
Configure integrated GPU for rendering and NVIDIA GPU for CUDA works in Ubuntu 18.04
· 4 min read · 693 words

In fact, besides CUDA tasks (which could be deep neural network training), our operating system also consumes a decent amount of memory for graphic rendering. This article will guide you to use onboard graphic card for display, thereby saving a considerable amount of GPU VRAM for model training. It's especially useful when you have an NVIDIA GPU with a small memory size.
- First, you need:
- A computer using Ubuntu or equivalent operating system. Here I use Ubuntu 18.04.
- Your computer has an onboard graphics card (from Intel) and (of course) an NVIDIA GPU.
- You plug the monitor cord into the graphics output port (possibly HDMI) on the mainboard instead of on the GPU card. ** You may need to configure the BIOS for the system to output the video to the HDMI port on the motherboard when booting. **
Step 1: Install drivers for NVIDIA GPU and CUDA (optional - you can skip if you already have GPU drivers and CUDA toolkit installed)
I will guide you through these steps to install necessary drivers and CUDA packages.
First, open Terminal (Ctrl+Alt+t).
You need to delete the preinstalled CUDA PPA and nvidia-cuda-toolkit package. This will ensure that you can properly install the desired version of drivers:
sudo rm /etc/apt/sources.list.d/cuda*
sudo apt remove --autoremove nvidia-cuda-toolkit
Remove old driver (recommended)
sudo apt remove --autoremove nvidia-*
Update your system packages:
sudo apt update && sudo apt full-upgrade
Add PPA and setup key server:
sudo add-apt-repository ppa:graphics-drivers/ppa
sudo apt-key adv --fetch-keys  http://developer.download.nvidia.com/compute/cuda/repos/ubuntu1804/x86_64/7fa2af80.pub
Add driver repositories:
sudo bash -c 'echo "deb http://developer.download.nvidia.com/compute/cuda/repos/ubuntu1804/x86_64 /" > /etc/apt/sources.list.d/cuda.list'
sudo bash -c 'echo "deb http://developer.download.nvidia.com/compute/machine-learning/repos/ubuntu1804/x86_64 /" > /etc/apt/sources.list.d/cuda_learn.list'
Update package database again:
sudo apt update
And, install CUDA 10.0. Please note that, when you type the following command, the suitable driver version for GPU is also installed.
sudo apt install cuda-10-0
Install cudnn package (for deep learning applications):
sudo apt install libcudnn7
Finnaly, you need to open ~/.profile (using Nano: nano ~/.profile) and append following content:
# set PATH for cuda 10.0 installation
if [ -d "/usr/local/cuda-10.0/bin/" ]; then
    export PATH=/usr/local/cuda-10.0/bin${PATH:+:${PATH}}
    export LD_LIBRARY_PATH=/usr/local/cuda-10.0/lib64${LD_LIBRARY_PATH:+:${LD_LIBRARY_PATH}}
fi
After this step, you will need to restart your computer and check if CUDA is installed correctly using nvcc --version.
Step 2: Configure the system to use integrated GPU card for displaying and NVIDIA GPU for CUDA works
- Create file at
/etc/X11/xorg.confwith following content (using Nano:sudo nano /etc/X11/xorg.conf):
Section "Device"
    Identifier      "intel"
    Driver          "intel"
    BusId           "PCI:0:2:0"
EndSection

Section "Screen"
    Identifier      "intel"
    Device          "intel"
EndSection
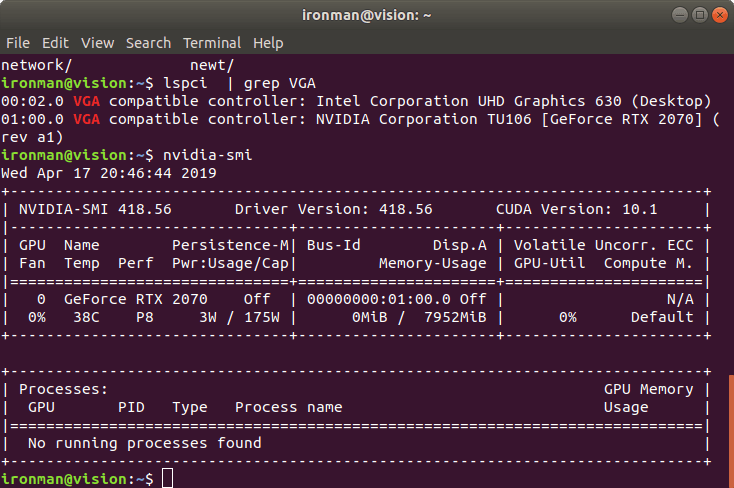
Note that you have to change BusId (PCI:0:2:0) to your integrated GPU. List all graphic cards by following command: (Note that my Intel graphic card is 00:02.0, so I use PCI:0:2:0 for BusId.)
lspci | grep VGA
00:02.0 VGA compatible controller: Intel Corporation UHD Graphics 630 (Desktop)
01:00.0 VGA compatible controller: NVIDIA Corporation TU106 [GeForce RTX 2070] (rev a1)
- Restart your workstation again to check the result.
Step 3: Check the result
If everything goes in the right direction, after restarting the computer, your workstation will use the onboard card for rendering and NVIDIA GPU for CUDA works. Check with the following command when you are not running any CUDA work yourself:
nvidia-smi
If you see No running processes found like following figure, your system is using integrated card for displaying. You can run a training task (or any other CUDA task) to ensure that the CUDA system can still operate properly.
Note that a wrong configuration in step 2 can break your system. If it happens, please reboot into recovery mode and remove /etc/X11/xorg.conf by using rm /etc/X11/xorg.conf command. Thank you for reading my post!
Keep reading
- The GPU Was Already There: Four Silent Bugs in On-Device Training
Training is moving back onto the machines people own, and those machines are not a fleet you control. Apple GPU support sat on my plan for two years because nothing looked broken; the runs finished, they were just slower. Turning Metal on was worth 1.7x to 4.2x per epoch on the one M1 I own, and much less end to end. The measuring is what found the real bugs, three of which never raised anything: is_bf16_supported() answering True on a card that only emulates it, a gradient scaler silently dropping optimiser steps and halving a mAP, and 16-bit being slower than 32-bit on Apple Silicon even though everything works.
- Setup Different Fractional Scaling for Different Screens in Ubuntu
Ubuntu 24.04 cannot run different fractional scaling on a 4K laptop panel and a 2K external monitor. Upgrading to 24.10 and moving NVIDIA to Wayland fixes it.
- How to Install Kazam 2 on Ubuntu 24.04: The Best Easy Screen Recorder
Ubuntu 24.04 ships the original Kazam, not Kazam 2. How to build and install Kazam 2 from source, with the dependencies, PulseAudio support, and the optional OCR components.