# With Daisykit – Everyone can build AI projects!
**Published:** January 13, 2022
**Tags:** Deployment
**Summary:** Daisykit, a graph-based C++ and Python toolkit for deploying AI pipelines, from face detection to pose estimation and barcodes, in a few lines of code.
---
Imagine you are a software engineer or a DIY hobbyist with great ideas
to build AI-powered projects. However, it will be such difficulty when
you know very little or nothing about AI. The complexity of deep
learning models is a barrier for everyone wishing to integrate AI
services into their projects. Understanding this problem, we are
designing and building an AI toolkit named Daisykit, focusing on the
ease of deployment and for everyone.
After two months of development, we want to share our design, progress,
and instructions to integrate Daisykit for AI tasks easily. Let's see
into our demo video below to understand more about Daisykit's abilities.
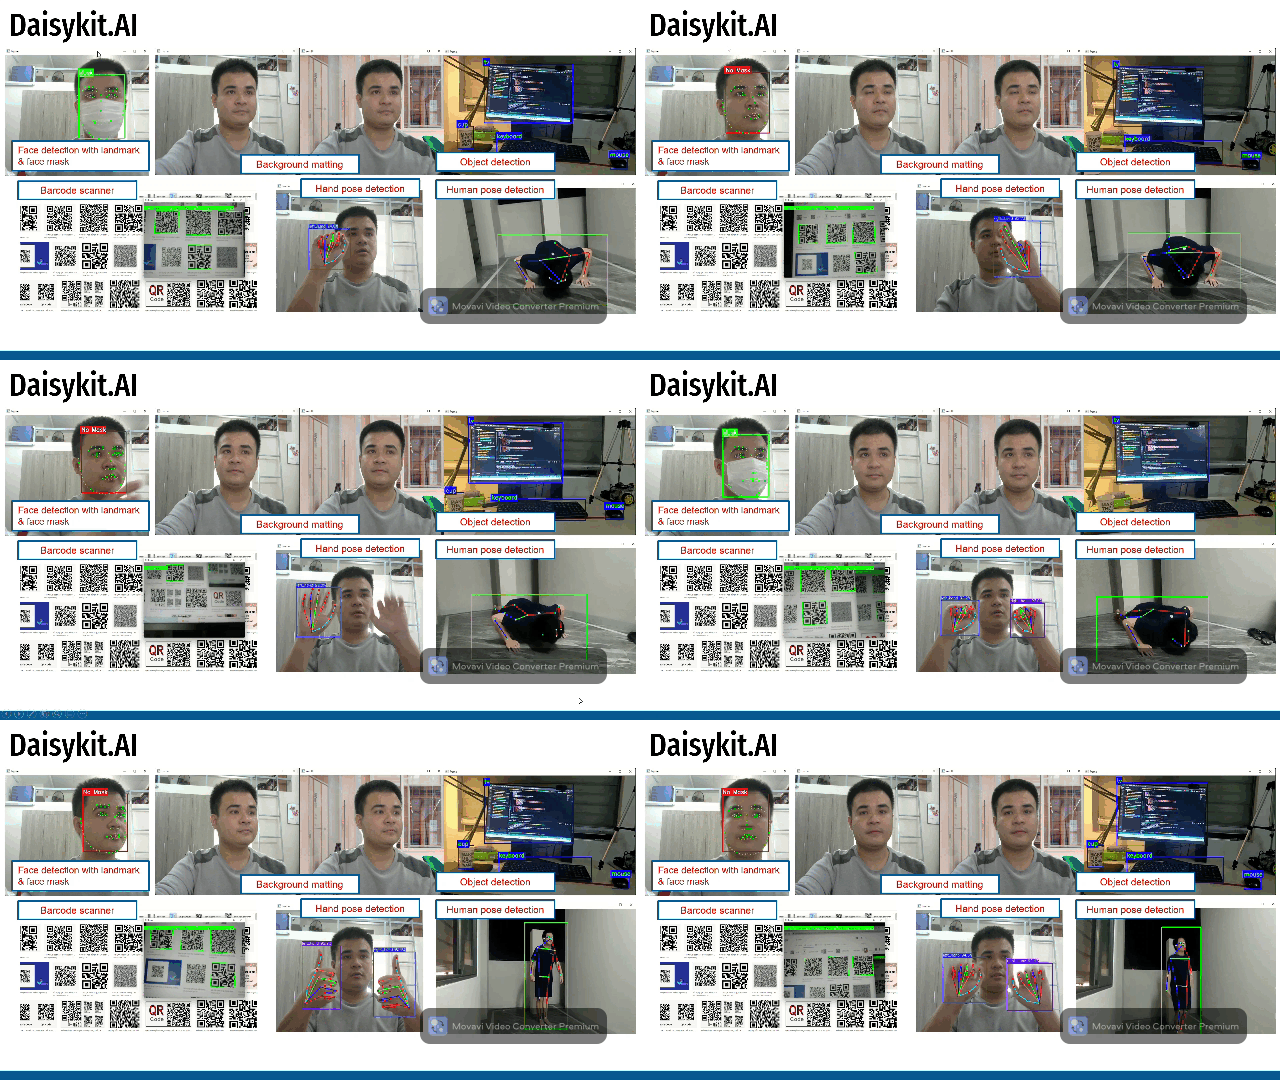 Object detection, face detection with the landmark, human pose
detection, background matting, fitness analyzers, … Popular deep
learning models are now integrated gradually into our toolkit, creating
a magic wand that helps you add AI to your system without knowing much
about internal architecture. Daisykit will be a community-driven
toolkit, which means all features will be voted, developed, and served
back to the community to ensure there are as many as people benefit from
our framework.
In this blog post, we will introduce the detailed design of our system
in part I, some how-to-use Python examples in part II, and deployment in
mobile devices in part III. If you want to touch our toolkit immediately
without knowing much about the design, just skip the first part and jump
into coding from the second part.
## 1. Design
Before going to the idea of Daisykit, we also did some research about
current deep learning inference frameworks available in the market.
Besides hybrid frameworks for both training and inference such as
Tensorflow, Pytorch, MXNet, Paddle Paddle, … we can also see frameworks
tailor-made for inference like TensorRT, Intel OpenVINO, TFLite, CoreML,
TFJS, NCNN, .... to infer faster with lower resources. Hybrid frameworks
for both training and inference often have a large distribution size and
many dependencies. Therefore, they may not be suitable for deployment in
many cases. By taking advantage of hardware-specific instructions and
optimizations, inference-focus engines often give better performance.
However, we often see AI systems as media processing pipelines in
real-world use cases, where AI models are the small steps. Pipeline
model inference frameworks such as [_NVIDIA
Deepstream_](https://developer.nvidia.com/deepstream-sdk),
[_NNStreamer_](https://nnstreamer.ai/), or [_Google
Mediapipe_](https://github.com/google/mediapipe) came into play to solve
the optimization problem for complex systems, where AI models and other
processing steps can be organized to run parallelly with an optimal
amount of resources. [_Daisykit_](https://daisykit.nrl.ai/) is also
our effort to build a pipeline framework for deep learning, having a
good performance in wide ranges of hardware but easy-to-use interfaces.
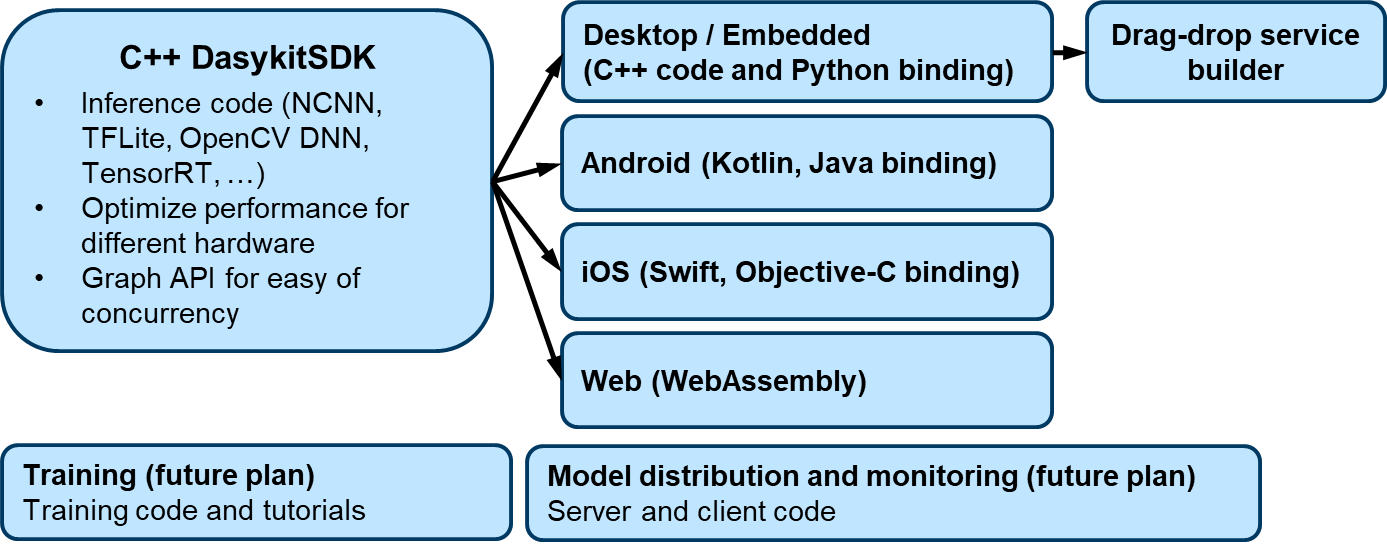
### Development plan
Our development plan is inspired a lot by [_Google
Mediapipe_](https://github.com/google/mediapipe). We use C++ to develop
a [_core SDK_](https://github.com/Daisykit-AI/daisykit), which contains
media processing algorithms, model inference, and graph APIs for
concurrency. Currently, our framework supports models with
[_NCNN_](https://github.com/Tencent/ncnn%5C) and [_OpenCV
DNN_](https://docs.opencv.org/4.x/d2/d58/tutorial_table_of_content_dnn.html)
engines. However, we will add other engines to maximize system
compatibility and reduce the effort of model conversion in the future.
Using the [_Daisykit core
SDK_](https://github.com/Daisykit-AI/daisykit), we develop wrappers and
sample applications for different platforms such as desktop computers,
embedded systems, mobile devices, and web browsers. C++, Python wrapper,
and Android examples are now available in our repositories. Although we
are focusing on model deployment and system architecture in the current
phase of the project, we planned to provide training code, tutorials,
and a mechanism for model distribution and monitoring in the future.
### Graph-based design for concurrent flow
Many concurrent frameworks take advantage of graph architecture to build
processing pipelines. [_ROS_](https://www.ros.org/) is a popular
robotics framework where each Node is a processing unit, communicates
with each other via [_inter-processing
communication_](https://en.wikipedia.org/wiki/Inter-process_communication)
(IPC). In the world of media processing,
[_GStreamer_](https://gstreamer.freedesktop.org/) can construct a
processing graph of media components with different operations.
[_NNStreamer_](https://nnstreamer.ai/) and [_NVIDIA
DeepStream_](https://developer.nvidia.com/deepstream-sdk) make use of
[_GStreamer_](https://gstreamer.freedesktop.org/) framework by writing
plugins to run AI operations. DeepStream has been very successful with
NVIDIA hardware. However, it's not an open-source solution and could not
be ported to run on non-NVIDIA hardware.
[_NNStreamer_](https://github.com/nnstreamer/nnstreamer-example) and
[_DeepStream_](https://developer.nvidia.com/deepstream-sdk) ability is
also limited by how people can write a GStreamer plugin. OpenCV 4.0 also
has Graph API but is limited in image processing applications. [_Google
Mediapipe_](https://mediapipe.dev/) learned from other frameworks in the
market to architect a system that is flexible enough to handle multiple
types of data while maintaining high performance and multiplatform
ability. Although pre-trained models from Google often have high
accuracy and excellent inference speed, the Mediapipe framework only
supports Google engines like TFLite. Our framework
[_Daisykit_](https://daisykit.nrl.ai/) is inspired by Mediapipe
architecture; however, we want to build an open framework where
different inference engines and pre-trained models from various sources
are integrated. That will maximize the ease of deployment and the number
of models people can use for their projects.
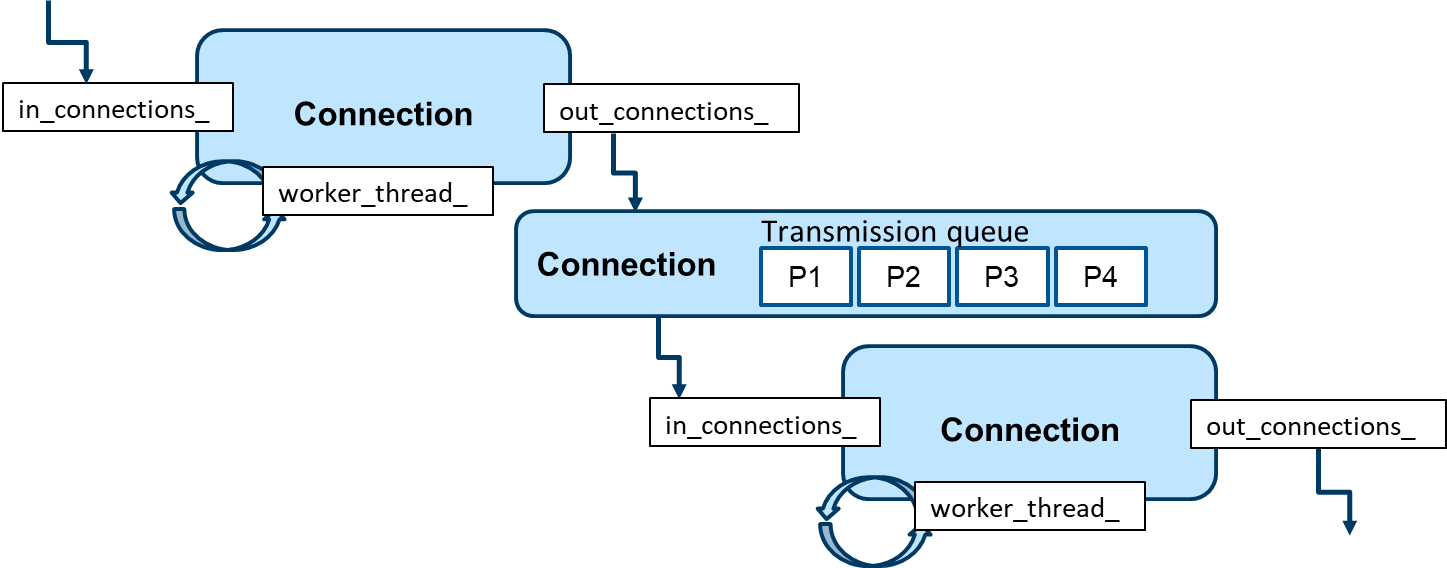
Above is an illustration of the connection between 2 processing nodes,
each Node for a processing task. For example, in facial landmark
detection flow, we consider face detection and landmark regression as
two separated nodes. Connecting the face detection node before the
landmark regression node indicates that the result of face detection
will be used as the input for facial landmark regression. For each Node
in our graph, we have multiple input and multiple output connections,
which are `in_connections_` and `out_connections_`,
respectively. Data processing is handled by `worker_thread_` defined
in the `Node`. Each element in `in_connections_` and
`out_connections_` is a `Connection` instance, keeping a
transmission queue between 2 nodes. In each transmission queue, we have
multiple `Packet` instances, which are wrappers of processing data,
for example, images or processing results from the previous step. The
transmission is pretty lightweight because the `Packet` only keeps the
pointer to the data, not the data itself. The connection between two
nodes is controlled based on a `TransmissionProfile`, which defines
the maximum queue size, packet dropping, and other transmission
policies. You can find interfaces for these terms and their source code
in the Daisykit library
([_headers,_](https://github.com/Daisykit-AI/daisykit/tree/master/include/daisykitsdk/graphs/core)
[_source_](https://github.com/Daisykit-AI/daisykit/tree/master/src/graphs/core)).
The implementation of each graph is now available in C++.
You can find an example of face detector graph
[_here_](https://github.com/Daisykit-AI/daisykit/blob/master/src/examples/demo_face_detector_graph.cpp).
We first create separated nodes, connect them by **Graph::Connect()**,
activate the processing threads by **Node::Activate(),** and input the
data into the graph.
```C++
// Create processing nodes
std::shared_ptr packet_distributor_node =
std::make_shared("packet_distributor",
NodeType::kAsyncNode);
std::shared_ptr face_detector_node =
std::make_shared(
"face_detector",
"models/face_detection/yolo_fastest_with_mask/"
"yolo-fastest-opt.param",
"models/face_detection/yolo_fastest_with_mask/"
"yolo-fastest-opt.bin",
NodeType::kAsyncNode);
std::shared_ptr
facial_landmark_detector_node =
std::make_shared(
"facial_landmark_detector",
"models/facial_landmark/pfld-sim.param",
"models/facial_landmark/pfld-sim.bin", NodeType::kAsyncNode);
std::shared_ptr face_visualizer_node =
std::make_shared("face_visualizer",
NodeType::kAsyncNode, true);
// Create connections between nodes
Graph::Connect(nullptr, "", packet_distributor_node.get(), "input",
TransmissionProfile(2, true), true);
Graph::Connect(packet_distributor_node.get(), "output",
face_detector_node.get(), "input",
TransmissionProfile(2, true), true);
Graph::Connect(packet_distributor_node.get(), "output",
facial_landmark_detector_node.get(), "image",
TransmissionProfile(2, true), true);
Graph::Connect(face_detector_node.get(), "output",
facial_landmark_detector_node.get(), "faces",
TransmissionProfile(2, true), true);
Graph::Connect(packet_distributor_node.get(), "output",
face_visualizer_node.get(), "image",
TransmissionProfile(2, true), true);
Graph::Connect(facial_landmark_detector_node.get(), "output",
face_visualizer_node.get(), "faces",
TransmissionProfile(2, true), true);
// Need to init these nodes before use
// This method also start worker threads of asynchronous node
packet_distributor_node->Activate();
face_detector_node->Activate();
facial_landmark_detector_node->Activate();
face_visualizer_node->Activate();
VideoCapture cap(0);
while (1) {
Mat frame;
cap >> frame;
cv::cvtColor(frame, frame, cv::COLOR_BGR2RGB);
std::shared_ptr in_packet = Packet::MakePacket(frame);
packet_distributor_node->Input("input", in_packet);
}
```
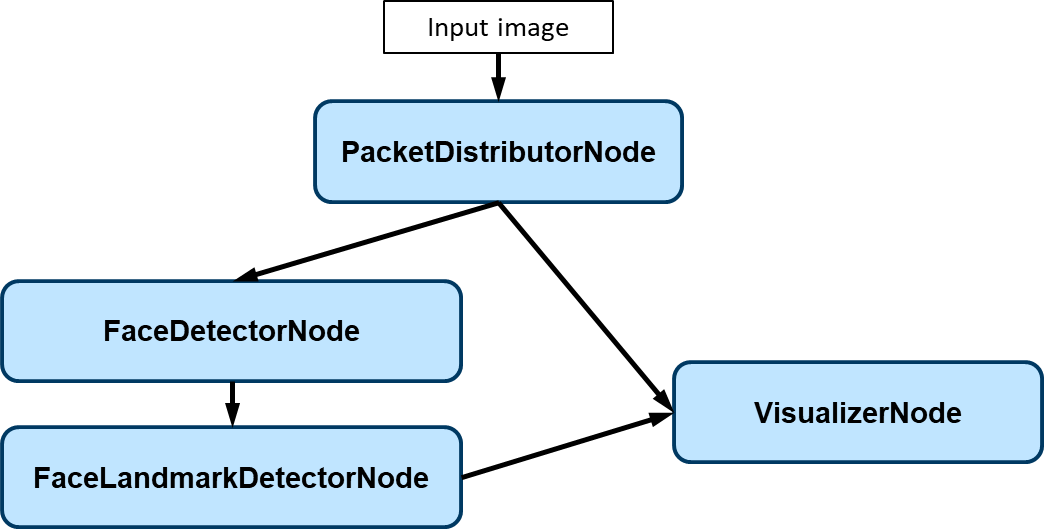
By experiments, we have seen the improvement in the frame rate of
multithreading with graphs compared to sequential processing. However,
the face detection graph may not be constructed optimally. In the next
phase of improvements, we want to learn from Mediapipe to add a loopback
connection in **FaceLandmarkDetectorNode** to use landmark results for
tracking faces, reducing the dependency in the speed of
**FaceDetectorNode**.
The concurrency architect will be handled by the internal code of
Daisykit. Note that these graph APIs are still experimental and only
available in C++ now. In the future, we will refine the APIs for
easy-to-use interfaces, support constructing graphs from configuration
files and other language wrappers. We really want to have your comments
and contributions to the concurrency design and implementation of
Daisykit.
## 2. Deploy AI in your systems with just a few lines of code
Python is a beginner-friendly language and is widely used in different
DIY and software projects. That's why we choose Python as a language to
focus on. This section introduces some examples of how Daisykit can be
applied for AI tasks.
Currently, Daisykit supports six models from different sources. See the
details about each model
[_here._](https://daisykit.nrl.ai/md_models.html) The list of
supported models:
- Person detection
- Facial landmark detection: [_https://github.com/polarisZhao/PFLD-pytorch_](https://github.com/polarisZhao/PFLD-pytorch)
- Face detection (with wearing face mask output): [_https://github.com/waittim/mask-detector_](https://github.com/waittim/mask-detector)
- Human segmentation (for background matting): [_https://github.com/lizhengwei1992/Fast_Portrait_Segmentation_](https://github.com/lizhengwei1992/Fast_Portrait_Segmentation)
- Human pose estimation from Google MoveNet: [_https://www.tensorflow.org/hub/tutorials/movenet_](https://www.tensorflow.org/hub/tutorials/movenet)
- Object detection with YOLOX: [_https://github.com/Megvii-BaseDetection/YOLOX_](https://github.com/Megvii-BaseDetection/YOLOX)
For each model, we have inference code, and some models have links to
training source code. Please don't worry about the limited number of
models for now. We are adding more and more models so that people can
only have to select and run. We will also add training code and
tutorials for as many models as possible. Some models will be added soon
to our framework:
- Object tracking with LightTrack: [_https://github.com/researchmm/LightTrack_](https://github.com/researchmm/LightTrack)
- Facial recognition
- Super-resolution model for improving image quality.
### Install Daisykit for Python
We have prebuilt Python packages for Linux x86_64 and Windows x86_64
only CPU now. For other environments or GPU support, you need to install
OpenCV C++, Vulkan and build the Python package from scratch.
Install on Ubuntu:
```shell
sudo apt install pybind11-dev libopencv-dev libvulkan-dev # Dependencies
pip3 install --upgrade pip # Ensure pip is updated
pip3 install daisykit
```
Install on Windows:
```bash
pip3 install daisykit
```
We prepared a Google Colab notebook here for all demo applications for
ease of environment setup. However, due to the limitations of the Colab
environment, we only run the demo with images here. Link to Colab
notebook:
[_https://colab.research.google.com/drive/1LFg3xcoFr3wxuJmn3c4LEJiW2G7oP7F5?usp=sharing_](https://colab.research.google.com/drive/1LFg3xcoFr3wxuJmn3c4LEJiW2G7oP7F5?usp=sharing).
### Face detection flow: Detect faces + landmark
Face detector flow in Daisykit contains a face detection model based on
[_YOLO Fastest_](https://github.com/dog-qiuqiu/Yolo-Fastest) and a
facial landmark detection model based on
[_PFLD_](https://github.com/polarisZhao/PFLD-pytorch). In addition, to
encourage makers to join hands in the fighting with COVID-19, we
selected a face detection model that can recognize people wearing face
masks or not.

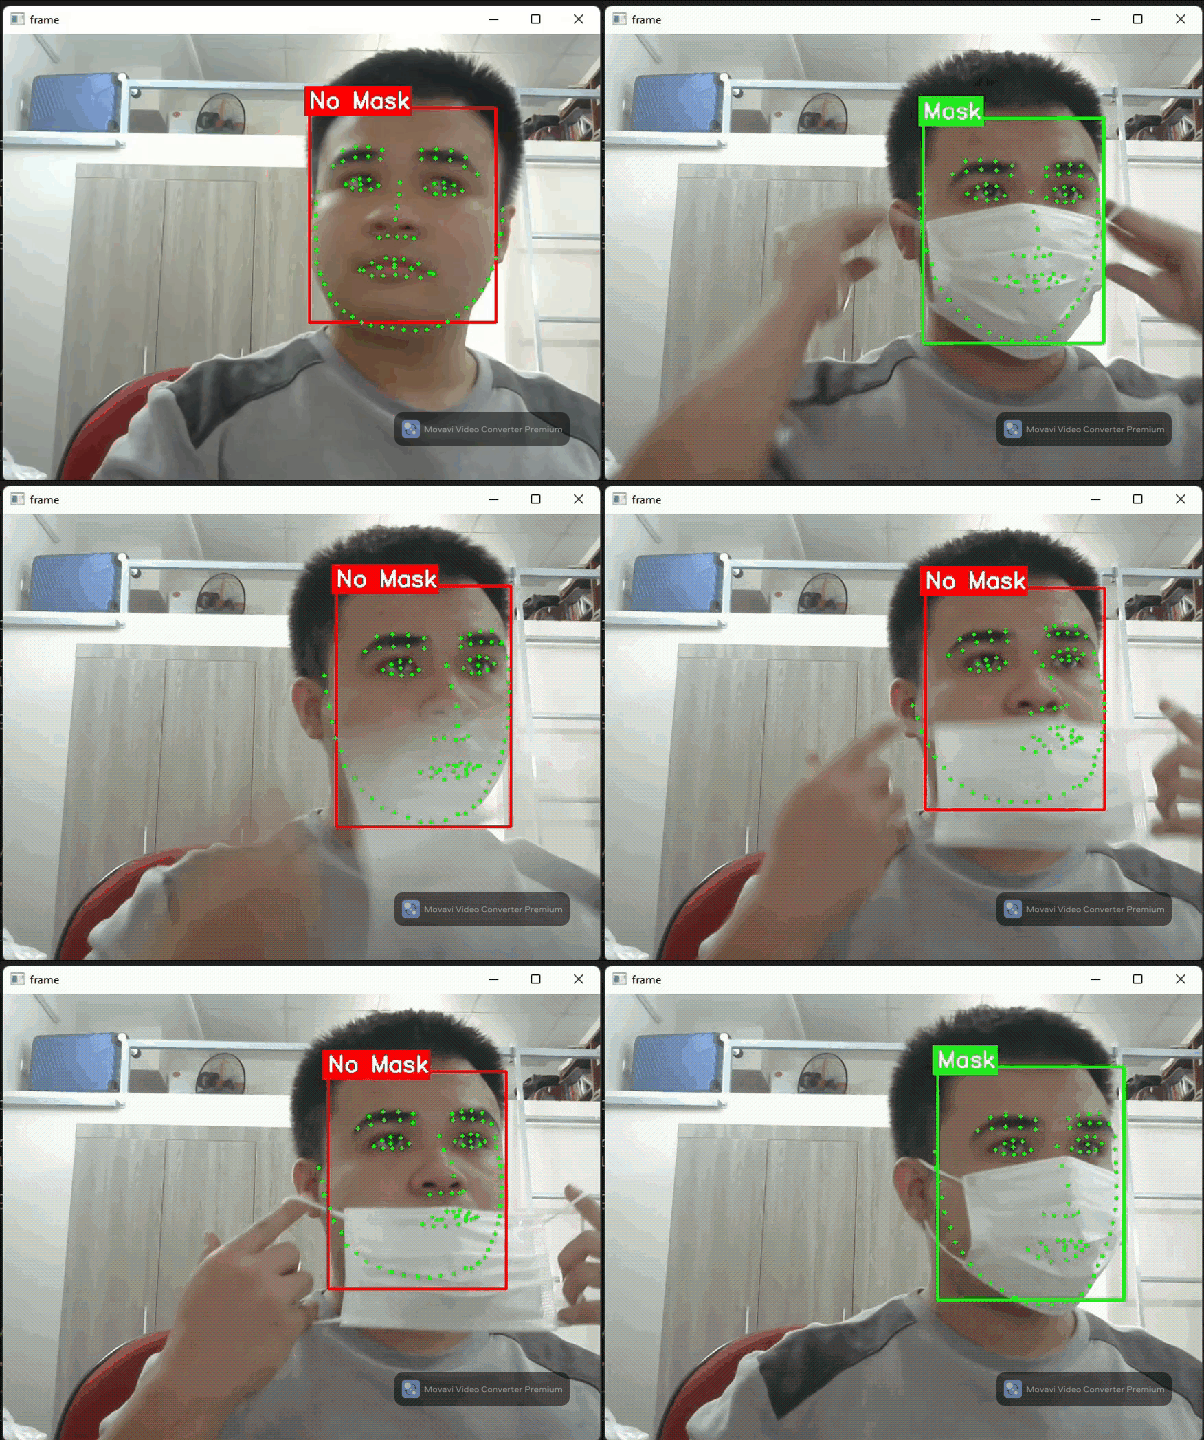
Let's see into the source code below to understand how to run this model
with your webcam. First, we initialize the flow with a `config`
dictionary. It contains information about the models used in the flow.
`get_asset_file()` function will automatically download the models
and weights files from
[_https://github.com/Daisykit-AI/daisykit-assets_](https://github.com/Daisykit-AI/daisykit-assets),
so you don't have to care about downloading them manually. The
downloading only happens the first time we use the models. After that,
you can run this code offline. You also can download all files yourself
and put the paths to file in instead of `get_asset_file()`. If you don't need facial landmark output, set
`with_landmark` to `False`.
```python
import cv2
import json
from daisykit.utils import get_asset_file, to_py_type
import daisykit
config = {
"face_detection_model": {
"model": get_asset_file("models/face_detection/yolo_fastest_with_mask/yolo-fastest-opt.param"),
"weights": get_asset_file("models/face_detection/yolo_fastest_with_mask/yolo-fastest-opt.bin"),
"input_width": 320,
"input_height": 320,
"score_threshold": 0.7,
"iou_threshold": 0.5,
"use_gpu": False
},
"with_landmark": True,
"facial_landmark_model": {
"model": get_asset_file("models/facial_landmark/pfld-sim.param"),
"weights": get_asset_file("models/facial_landmark/pfld-sim.bin"),
"input_width": 112,
"input_height": 112,
"use_gpu": False
}
}
face_detector_flow = daisykit.FaceDetectorFlow(json.dumps(config))
# Open video stream from webcam
vid = cv2.VideoCapture(0)
while(True):
# Capture the video frame
ret, frame = vid.read()
frame = cv2.cvtColor(frame, cv2.COLOR_BGR2RGB)
faces = face_detector_flow.Process(frame)
# for face in faces:
# print([face.x, face.y, face.w, face.h,
# face.confidence, face.wearing_mask_prob])
face_detector_flow.DrawResult(frame, faces)
frame = cv2.cvtColor(frame, cv2.COLOR_RGB2BGR)
# Convert faces to Python list of dict
faces = to_py_type(faces)
# Display the resulting frame
cv2.imshow('frame', frame)
# The 'q' button is set as the
# quitting button you may use any
# desired button of your choice
if cv2.waitKey(1) & 0xFF == ord('q'):
break
# After the loop release the cap object
vid.release()
# Destroy all the windows
cv2.destroyAllWindows()
```
All flows in Daisykit are initialized by a configuration string.
Therefore we use **json.dumps()** to convert the config dictionary to a
string. For example, in face detector flow:
```python
face_detector_flow = daisykit.FaceDetectorFlow(json.dumps(config))
```
Run the flow to get detected faces by:
```python
faces = face_detector_flow.Process(frame)
```
You can use the **DrawResult()** method to visualize the result or write
a drawing function yourself. This AI flow can be used in DIY projects
such as [_smart COVID-19
camera_](https://github.com/vietanhdev/smart-face-mask-cam) or
Snap-chat-like camera decorators.
### Human pose detection flow
The human pose detector module contains an SSD-MobileNetV2 body detector
and a ported Google MoveNet model for human keypoints. This module can
be applied in fitness applications and AR games.

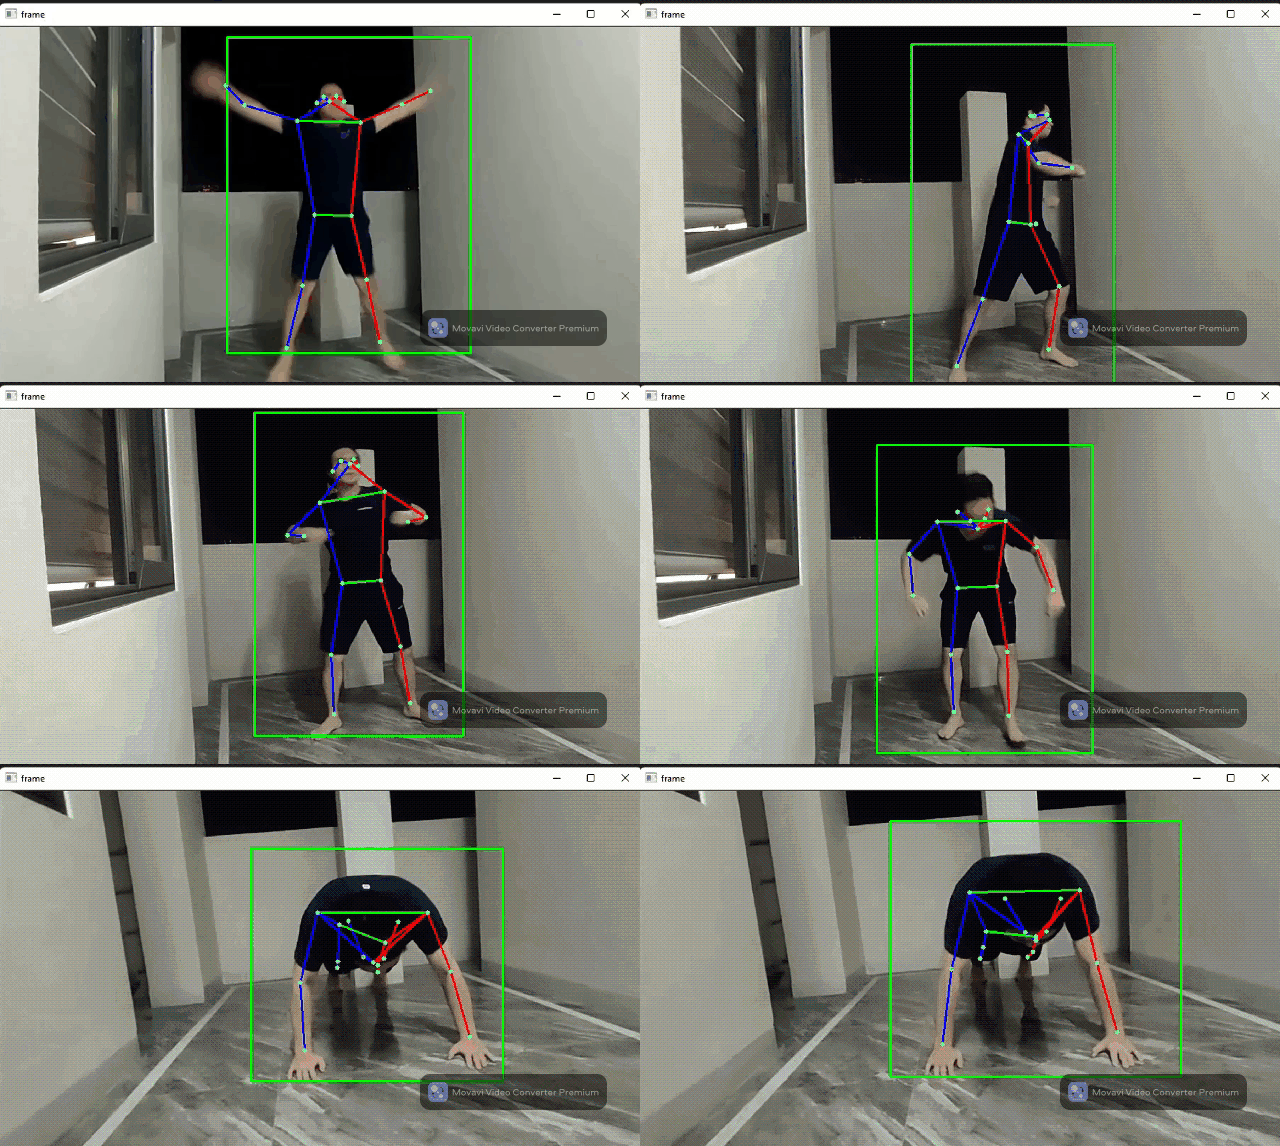
**Source code:**
```python
import cv2
import json
from daisykit.utils import get_asset_file, to_py_type
from daisykit import HumanPoseMoveNetFlow
config = {
"person_detection_model": {
"model": get_asset_file("models/human_detection/ssd_mobilenetv2.param"),
"weights": get_asset_file("models/human_detection/ssd_mobilenetv2.bin"),
"input_width": 320,
"input_height": 320,
"use_gpu": False
},
"human_pose_model": {
"model": get_asset_file("models/human_pose_detection/movenet/lightning.param"),
"weights": get_asset_file("models/human_pose_detection/movenet/lightning.bin"),
"input_width": 192,
"input_height": 192,
"use_gpu": False
}
}
human_pose_flow = HumanPoseMoveNetFlow(json.dumps(config))
# Open video stream from webcam
vid = cv2.VideoCapture(0)
while(True):
# Capture the video frame
ret, frame = vid.read()
frame = cv2.cvtColor(frame, cv2.COLOR_BGR2RGB)
poses = human_pose_flow.Process(frame)
human_pose_flow.DrawResult(frame, poses)
frame = cv2.cvtColor(frame, cv2.COLOR_RGB2BGR)
# Convert poses to Python list of dict
poses = to_py_type(poses)
# Display the result frame
cv2.imshow('frame', frame)
# Press 'q' to exit
if cv2.waitKey(1) & 0xFF == ord('q'):
break
```
### Background matting flow
Background matting use only one segmentation model to generate a human
body mask. This mask can figure out which pixels belong to humans and
which belong to the background. This output can be used for background
replacement (like in the Google Meet app). The segmentation model was
taken from [_this
implementation_](https://github.com/nihui/ncnn-webassembly-portrait-segmentation)
by [_nihui_](https://github.com/nihui), the author of the NCNN
framework. The author also has a webpage for a live demo on web
browsers.
[_https://github.com/nihui/ncnn-webassembly-portrait-segmentation_](https://github.com/nihui/ncnn-webassembly-portrait-segmentation).
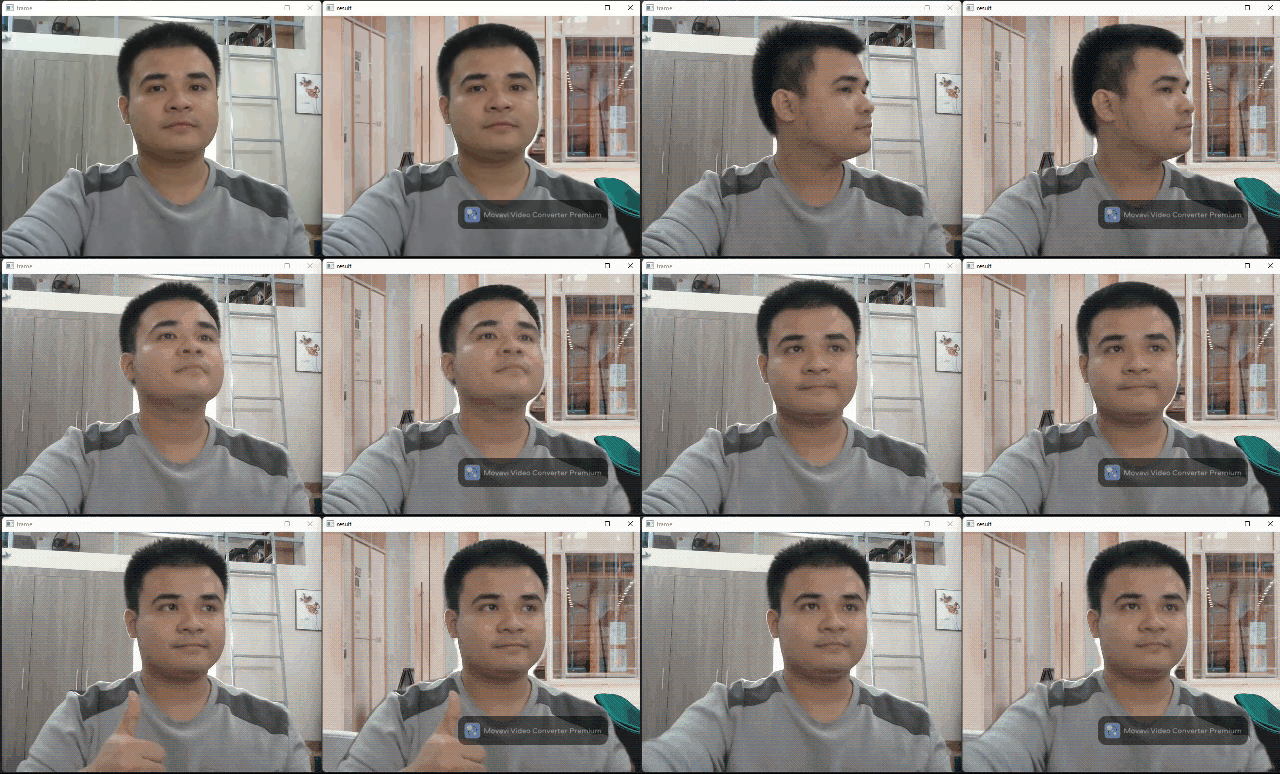
**Source code:**
```python
import cv2
import json
from daisykit.utils import get_asset_file
from daisykit import BackgroundMattingFlow
config = {
"background_matting_model": {
"model": get_asset_file("models/background_matting/erd/erdnet.param"),
"weights": get_asset_file("models/background_matting/erd/erdnet.bin"),
"input_width": 256,
"input_height": 256,
"use_gpu": False
}
}
# Load background
default_bg_file = get_asset_file("images/background.jpg")
background = cv2.imread(default_bg_file)
background = cv2.cvtColor(background, cv2.COLOR_BGR2RGB)
background_matting_flow = BackgroundMattingFlow(json.dumps(config), background)
# Open video stream from webcam
vid = cv2.VideoCapture(0)
while(True):
# Capture the video frame
ret, frame = vid.read()
image = cv2.cvtColor(frame, cv2.COLOR_BGR2RGB)
mask = background_matting_flow.Process(image)
background_matting_flow.DrawResult(image, mask)
image = cv2.cvtColor(image, cv2.COLOR_RGB2BGR)
# Display the result frame
cv2.imshow('frame', frame)
cv2.imshow('result', image)
# Press 'q' to exit
if cv2.waitKey(1) & 0xFF == ord('q'):
break
```
In the source code, we use `get_asset_file("images/background.jpg")`
to download the default background. You can use another image for the
background by replacing it with a path to an image file.
### Hand pose detection flow
The hand pose detection flow comprises two models: a hand detection
model based on YOLOX and a 3D hand pose detection model released by
Google this November. Thanks to
[_FeiGeChuanShu_](https://github.com/FeiGeChuanShu) for the effort in
early model conversion.

This hand pose flow can be used in AR games, hand gesture control, and
many cool DIY projects.
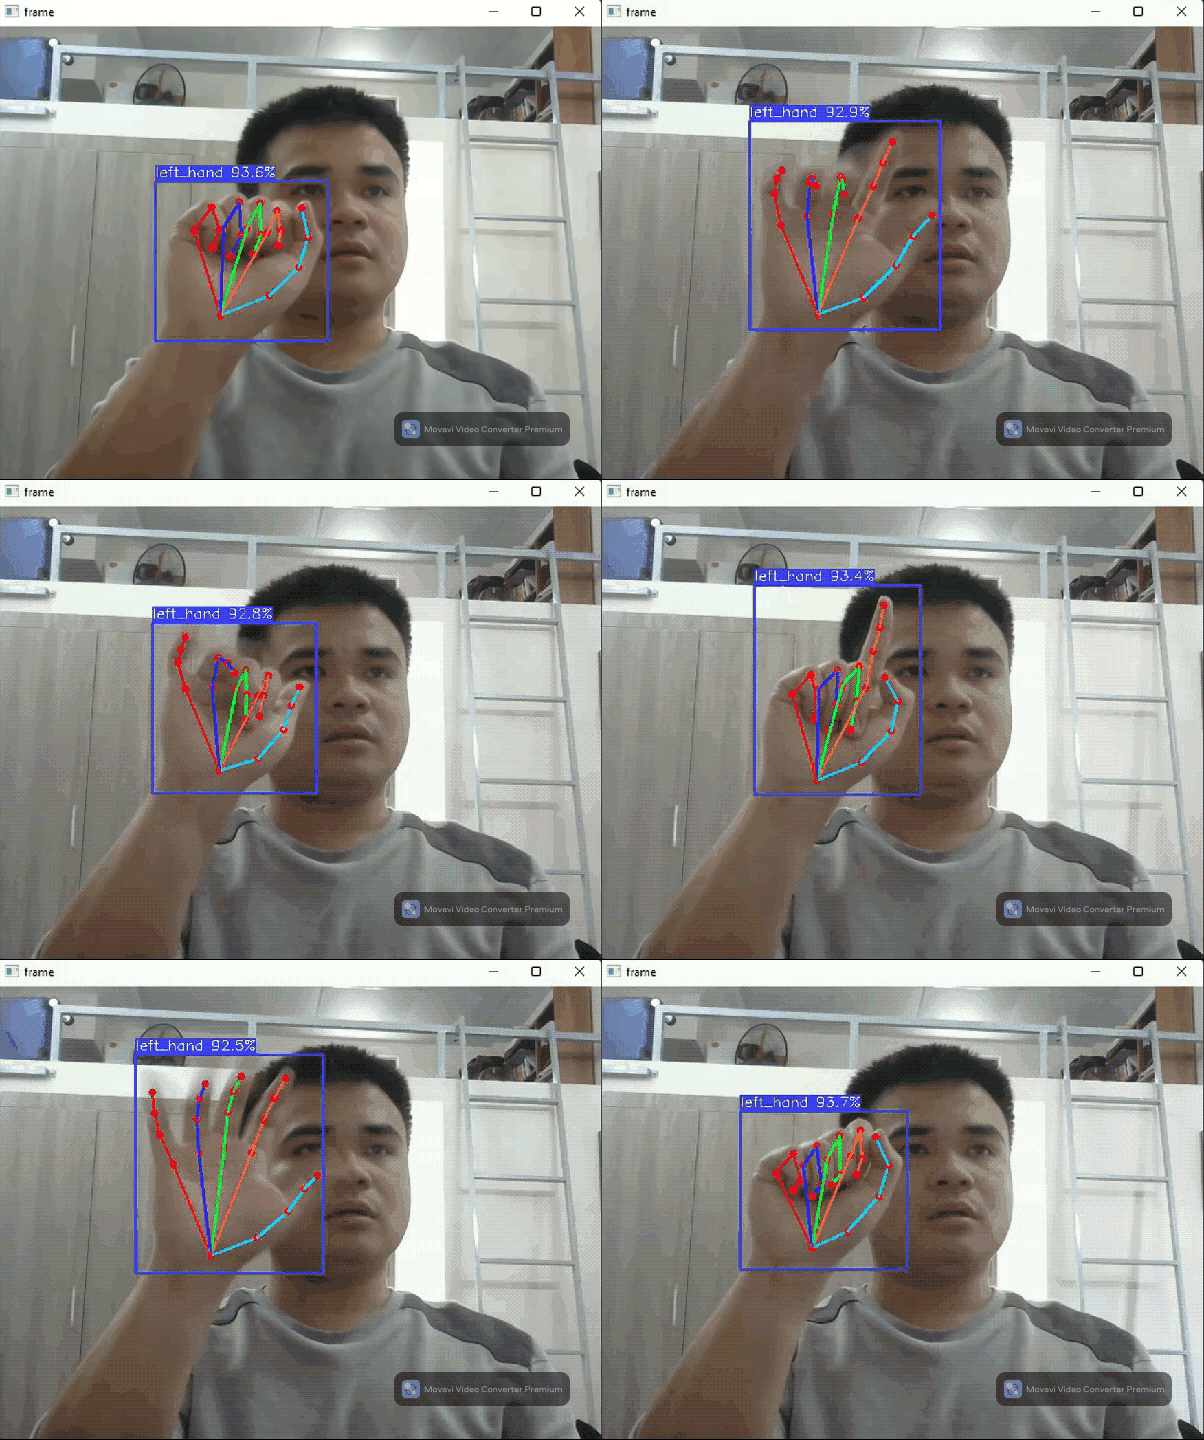
**Source code:**
```python
import cv2
import json
from daisykit.utils import get_asset_file, to_py_type
from daisykit import HandPoseDetectorFlow
config = {
"hand_detection_model": {
"model": get_asset_file("models/hand_pose/yolox_hand_swish.param"),
"weights": get_asset_file("models/hand_pose/yolox_hand_swish.bin"),
"input_width": 256,
"input_height": 256,
"score_threshold": 0.45,
"iou_threshold": 0.65,
"use_gpu": False
},
"hand_pose_model": {
"model": get_asset_file("models/hand_pose/hand_lite-op.param"),
"weights": get_asset_file("models/hand_pose/hand_lite-op.bin"),
"input_size": 224,
"use_gpu": False
}
}
flow = HandPoseDetectorFlow(json.dumps(config))
# Open video stream from webcam
vid = cv2.VideoCapture(0)
while(True):
# Capture the video frame
ret, frame = vid.read()
frame = cv2.cvtColor(frame, cv2.COLOR_BGR2RGB)
poses = flow.Process(frame)
flow.DrawResult(frame, poses)
frame = cv2.cvtColor(frame, cv2.COLOR_RGB2BGR)
# Convert poses to Python list of dict
poses = to_py_type(poses)
# Display the result frame
cv2.imshow('frame', frame)
# Press 'q' to exit
if cv2.waitKey(1) & 0xFF == ord('q'):
break
```
In the above source code, `input_width` and `input_height` of the
`hand_detection_model` can be adjusted for speed/accuracy trade-off.
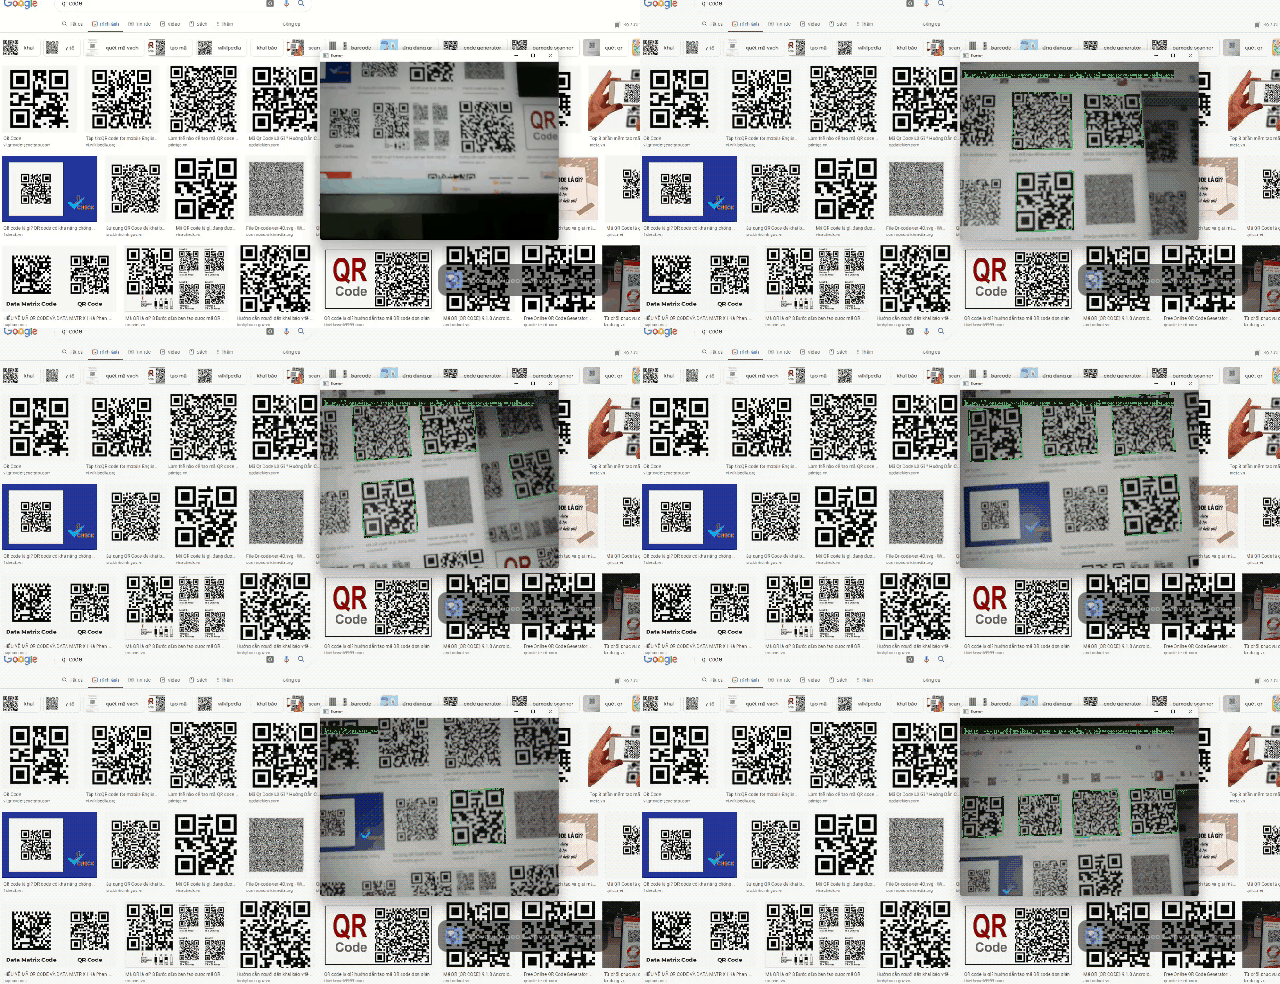
### Barcode detection
Barcodes can be used in a wide range of robotics and software
applications. That's why we integrated a barcode reader into Daisykit.
The core algorithms of the barcode reader are from [_the Zxing-CPP
project_](https://github.com/nu-book/zxing-cpp). This barcode processor
can read QR codes and bar codes in different formats.
**Source code:**
```python
import cv2
import json
from daisykit.utils import get_asset_file
from daisykit import BarcodeScannerFlow
config = {
"try_harder": True,
"try_rotate": True
}
barcode_scanner_flow = BarcodeScannerFlow(json.dumps(config))
# Open video stream from webcam
vid = cv2.VideoCapture(0)
while(True):
# Capture the video frame
ret, frame = vid.read()
frame = cv2.cvtColor(frame, cv2.COLOR_BGR2RGB)
result = barcode_scanner_flow.Process(frame, draw=True)
frame = cv2.cvtColor(frame, cv2.COLOR_RGB2BGR)
# Display the result frame
cv2.imshow('frame', frame)
# Press 'q' to exit
if cv2.waitKey(1) & 0xFF == ord('q'):
break
```
### Object detection
A general-purpose object detector based on
[_YOLOX_](https://github.com/Megvii-BaseDetection/YOLOX) is integrated
with Daisykit. The models are trained on the COCO dataset using the
[_official repository of
YOLOX_](https://github.com/Megvii-BaseDetection/YOLOX). You can retrain
the model with your custom dataset and convert it to NCNN format, which
can be integrated into Daisykit easily.

**Source code:**
```python
import cv2
import json
from daisykit.utils import get_asset_file, to_py_type
from daisykit import ObjectDetectorFlow
config = {
"object_detection_model": {
"model": get_asset_file("models/object_detection/yolox-tiny.param"),
"weights": get_asset_file("models/object_detection/yolox-tiny.bin"),
"input_width": 416,
"input_height": 416,
"score_threshold": 0.5,
"iou_threshold": 0.8,
"use_gpu": False,
"class_names": [
"person", "bicycle", "car", "motorcycle", "airplane", "bus", "train", "truck", "boat", "traffic light",
"fire hydrant", "stop sign", "parking meter", "bench", "bird", "cat", "dog", "horse", "sheep", "cow",
"elephant", "bear", "zebra", "giraffe", "backpack", "umbrella", "handbag", "tie", "suitcase", "frisbee",
"skis", "snowboard", "sports ball", "kite", "baseball bat", "baseball glove", "skateboard", "surfboard",
"tennis racket", "bottle", "wine glass", "cup", "fork", "knife", "spoon", "bowl", "banana", "apple",
"sandwich", "orange", "broccoli", "carrot", "hot dog", "pizza", "donut", "cake", "chair", "couch",
"potted plant", "bed", "dining table", "toilet", "tv", "laptop", "mouse", "remote", "keyboard", "cell phone",
"microwave", "oven", "toaster", "sink", "refrigerator", "book", "clock", "vase", "scissors", "teddy bear",
"hair drier", "toothbrush"
]
}
}
flow = ObjectDetectorFlow(json.dumps(config))
# Open video stream from webcam
vid = cv2.VideoCapture(0)
while(True):
# Capture the video frame
ret, frame = vid.read()
frame = cv2.cvtColor(frame, cv2.COLOR_BGR2RGB)
poses = flow.Process(frame)
flow.DrawResult(frame, poses)
frame = cv2.cvtColor(frame, cv2.COLOR_RGB2BGR)
# Convert poses to Python list of dict
poses = to_py_type(poses)
# Display the result frame
cv2.imshow('frame', frame)
# Press 'q' to exit
if cv2.waitKey(1) & 0xFF == ord('q'):
break
```
If you have any difficulty running the examples above, we prepared a
Colab environment to try them without setting up a local environment.
Access our Colab notebook at:
[_https://colab.research.google.com/drive/1LFg3xcoFr3wxuJmn3c4LEJiW2G7oP7F5\#scrollTo=2BLn9OfaQQtM_](https://colab.research.google.com/drive/1LFg3xcoFr3wxuJmn3c4LEJiW2G7oP7F5#scrollTo=2BLn9OfaQQtM)
### 3. Deployment for mobile phone
Besides Python, Daisykit teams also developed Daisykit examples for
mobile phones to cover as many use cases as possible. Access our
repository for Android
[_here_](https://github.com/Daisykit-AI/daisykit-android). We provided
detailed instructions on how to set up and run the project with Android
Studio in the [_README
file_](https://github.com/Daisykit-AI/daisykit-android) with three
steps:
- Clone repository with all submodules
- Download prebuilt OpenCV, NCNN libraries and put them in the right location
- Open the project with Android Studio, build and run examples
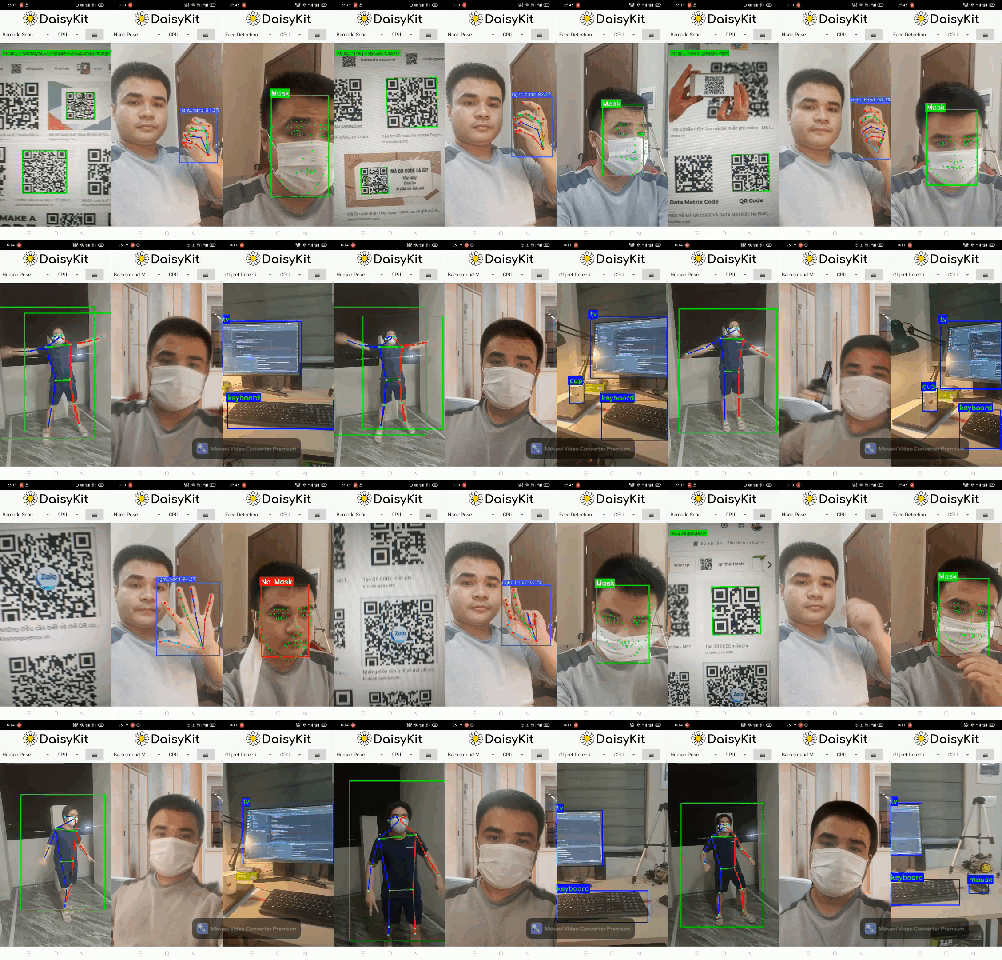
There are also six demo flows in the Android example. We integrated all
of them into a single mobile app for convenience.
Object detection, face detection with the landmark, human pose
detection, background matting, fitness analyzers, … Popular deep
learning models are now integrated gradually into our toolkit, creating
a magic wand that helps you add AI to your system without knowing much
about internal architecture. Daisykit will be a community-driven
toolkit, which means all features will be voted, developed, and served
back to the community to ensure there are as many as people benefit from
our framework.
In this blog post, we will introduce the detailed design of our system
in part I, some how-to-use Python examples in part II, and deployment in
mobile devices in part III. If you want to touch our toolkit immediately
without knowing much about the design, just skip the first part and jump
into coding from the second part.
## 1. Design
Before going to the idea of Daisykit, we also did some research about
current deep learning inference frameworks available in the market.
Besides hybrid frameworks for both training and inference such as
Tensorflow, Pytorch, MXNet, Paddle Paddle, … we can also see frameworks
tailor-made for inference like TensorRT, Intel OpenVINO, TFLite, CoreML,
TFJS, NCNN, .... to infer faster with lower resources. Hybrid frameworks
for both training and inference often have a large distribution size and
many dependencies. Therefore, they may not be suitable for deployment in
many cases. By taking advantage of hardware-specific instructions and
optimizations, inference-focus engines often give better performance.
However, we often see AI systems as media processing pipelines in
real-world use cases, where AI models are the small steps. Pipeline
model inference frameworks such as [_NVIDIA
Deepstream_](https://developer.nvidia.com/deepstream-sdk),
[_NNStreamer_](https://nnstreamer.ai/), or [_Google
Mediapipe_](https://github.com/google/mediapipe) came into play to solve
the optimization problem for complex systems, where AI models and other
processing steps can be organized to run parallelly with an optimal
amount of resources. [_Daisykit_](https://daisykit.nrl.ai/) is also
our effort to build a pipeline framework for deep learning, having a
good performance in wide ranges of hardware but easy-to-use interfaces.
### Development plan
Our development plan is inspired a lot by [_Google
Mediapipe_](https://github.com/google/mediapipe). We use C++ to develop
a [_core SDK_](https://github.com/Daisykit-AI/daisykit), which contains
media processing algorithms, model inference, and graph APIs for
concurrency. Currently, our framework supports models with
[_NCNN_](https://github.com/Tencent/ncnn%5C) and [_OpenCV
DNN_](https://docs.opencv.org/4.x/d2/d58/tutorial_table_of_content_dnn.html)
engines. However, we will add other engines to maximize system
compatibility and reduce the effort of model conversion in the future.
Using the [_Daisykit core
SDK_](https://github.com/Daisykit-AI/daisykit), we develop wrappers and
sample applications for different platforms such as desktop computers,
embedded systems, mobile devices, and web browsers. C++, Python wrapper,
and Android examples are now available in our repositories. Although we
are focusing on model deployment and system architecture in the current
phase of the project, we planned to provide training code, tutorials,
and a mechanism for model distribution and monitoring in the future.

### Graph-based design for concurrent flow
Many concurrent frameworks take advantage of graph architecture to build
processing pipelines. [_ROS_](https://www.ros.org/) is a popular
robotics framework where each Node is a processing unit, communicates
with each other via [_inter-processing
communication_](https://en.wikipedia.org/wiki/Inter-process_communication)
(IPC). In the world of media processing,
[_GStreamer_](https://gstreamer.freedesktop.org/) can construct a
processing graph of media components with different operations.
[_NNStreamer_](https://nnstreamer.ai/) and [_NVIDIA
DeepStream_](https://developer.nvidia.com/deepstream-sdk) make use of
[_GStreamer_](https://gstreamer.freedesktop.org/) framework by writing
plugins to run AI operations. DeepStream has been very successful with
NVIDIA hardware. However, it's not an open-source solution and could not
be ported to run on non-NVIDIA hardware.
[_NNStreamer_](https://github.com/nnstreamer/nnstreamer-example) and
[_DeepStream_](https://developer.nvidia.com/deepstream-sdk) ability is
also limited by how people can write a GStreamer plugin. OpenCV 4.0 also
has Graph API but is limited in image processing applications. [_Google
Mediapipe_](https://mediapipe.dev/) learned from other frameworks in the
market to architect a system that is flexible enough to handle multiple
types of data while maintaining high performance and multiplatform
ability. Although pre-trained models from Google often have high
accuracy and excellent inference speed, the Mediapipe framework only
supports Google engines like TFLite. Our framework
[_Daisykit_](https://daisykit.nrl.ai/) is inspired by Mediapipe
architecture; however, we want to build an open framework where
different inference engines and pre-trained models from various sources
are integrated. That will maximize the ease of deployment and the number
of models people can use for their projects.

Above is an illustration of the connection between 2 processing nodes,
each Node for a processing task. For example, in facial landmark
detection flow, we consider face detection and landmark regression as
two separated nodes. Connecting the face detection node before the
landmark regression node indicates that the result of face detection
will be used as the input for facial landmark regression. For each Node
in our graph, we have multiple input and multiple output connections,
which are `in_connections_` and `out_connections_`,
respectively. Data processing is handled by `worker_thread_` defined
in the `Node`. Each element in `in_connections_` and
`out_connections_` is a `Connection` instance, keeping a
transmission queue between 2 nodes. In each transmission queue, we have
multiple `Packet` instances, which are wrappers of processing data,
for example, images or processing results from the previous step. The
transmission is pretty lightweight because the `Packet` only keeps the
pointer to the data, not the data itself. The connection between two
nodes is controlled based on a `TransmissionProfile`, which defines
the maximum queue size, packet dropping, and other transmission
policies. You can find interfaces for these terms and their source code
in the Daisykit library
([_headers,_](https://github.com/Daisykit-AI/daisykit/tree/master/include/daisykitsdk/graphs/core)
[_source_](https://github.com/Daisykit-AI/daisykit/tree/master/src/graphs/core)).
The implementation of each graph is now available in C++.
You can find an example of face detector graph
[_here_](https://github.com/Daisykit-AI/daisykit/blob/master/src/examples/demo_face_detector_graph.cpp).
We first create separated nodes, connect them by **Graph::Connect()**,
activate the processing threads by **Node::Activate(),** and input the
data into the graph.
```C++
// Create processing nodes
std::shared_ptr packet_distributor_node =
std::make_shared("packet_distributor",
NodeType::kAsyncNode);
std::shared_ptr face_detector_node =
std::make_shared(
"face_detector",
"models/face_detection/yolo_fastest_with_mask/"
"yolo-fastest-opt.param",
"models/face_detection/yolo_fastest_with_mask/"
"yolo-fastest-opt.bin",
NodeType::kAsyncNode);
std::shared_ptr
facial_landmark_detector_node =
std::make_shared(
"facial_landmark_detector",
"models/facial_landmark/pfld-sim.param",
"models/facial_landmark/pfld-sim.bin", NodeType::kAsyncNode);
std::shared_ptr face_visualizer_node =
std::make_shared("face_visualizer",
NodeType::kAsyncNode, true);
// Create connections between nodes
Graph::Connect(nullptr, "", packet_distributor_node.get(), "input",
TransmissionProfile(2, true), true);
Graph::Connect(packet_distributor_node.get(), "output",
face_detector_node.get(), "input",
TransmissionProfile(2, true), true);
Graph::Connect(packet_distributor_node.get(), "output",
facial_landmark_detector_node.get(), "image",
TransmissionProfile(2, true), true);
Graph::Connect(face_detector_node.get(), "output",
facial_landmark_detector_node.get(), "faces",
TransmissionProfile(2, true), true);
Graph::Connect(packet_distributor_node.get(), "output",
face_visualizer_node.get(), "image",
TransmissionProfile(2, true), true);
Graph::Connect(facial_landmark_detector_node.get(), "output",
face_visualizer_node.get(), "faces",
TransmissionProfile(2, true), true);
// Need to init these nodes before use
// This method also start worker threads of asynchronous node
packet_distributor_node->Activate();
face_detector_node->Activate();
facial_landmark_detector_node->Activate();
face_visualizer_node->Activate();
VideoCapture cap(0);
while (1) {
Mat frame;
cap >> frame;
cv::cvtColor(frame, frame, cv::COLOR_BGR2RGB);
std::shared_ptr in_packet = Packet::MakePacket(frame);
packet_distributor_node->Input("input", in_packet);
}
```

By experiments, we have seen the improvement in the frame rate of
multithreading with graphs compared to sequential processing. However,
the face detection graph may not be constructed optimally. In the next
phase of improvements, we want to learn from Mediapipe to add a loopback
connection in **FaceLandmarkDetectorNode** to use landmark results for
tracking faces, reducing the dependency in the speed of
**FaceDetectorNode**.
The concurrency architect will be handled by the internal code of
Daisykit. Note that these graph APIs are still experimental and only
available in C++ now. In the future, we will refine the APIs for
easy-to-use interfaces, support constructing graphs from configuration
files and other language wrappers. We really want to have your comments
and contributions to the concurrency design and implementation of
Daisykit.
## 2. Deploy AI in your systems with just a few lines of code
Python is a beginner-friendly language and is widely used in different
DIY and software projects. That's why we choose Python as a language to
focus on. This section introduces some examples of how Daisykit can be
applied for AI tasks.
Currently, Daisykit supports six models from different sources. See the
details about each model
[_here._](https://daisykit.nrl.ai/md_models.html) The list of
supported models:
- Person detection
- Facial landmark detection: [_https://github.com/polarisZhao/PFLD-pytorch_](https://github.com/polarisZhao/PFLD-pytorch)
- Face detection (with wearing face mask output): [_https://github.com/waittim/mask-detector_](https://github.com/waittim/mask-detector)
- Human segmentation (for background matting): [_https://github.com/lizhengwei1992/Fast_Portrait_Segmentation_](https://github.com/lizhengwei1992/Fast_Portrait_Segmentation)
- Human pose estimation from Google MoveNet: [_https://www.tensorflow.org/hub/tutorials/movenet_](https://www.tensorflow.org/hub/tutorials/movenet)
- Object detection with YOLOX: [_https://github.com/Megvii-BaseDetection/YOLOX_](https://github.com/Megvii-BaseDetection/YOLOX)
For each model, we have inference code, and some models have links to
training source code. Please don't worry about the limited number of
models for now. We are adding more and more models so that people can
only have to select and run. We will also add training code and
tutorials for as many models as possible. Some models will be added soon
to our framework:
- Object tracking with LightTrack: [_https://github.com/researchmm/LightTrack_](https://github.com/researchmm/LightTrack)
- Facial recognition
- Super-resolution model for improving image quality.
### Install Daisykit for Python
We have prebuilt Python packages for Linux x86_64 and Windows x86_64
only CPU now. For other environments or GPU support, you need to install
OpenCV C++, Vulkan and build the Python package from scratch.
Install on Ubuntu:
```shell
sudo apt install pybind11-dev libopencv-dev libvulkan-dev # Dependencies
pip3 install --upgrade pip # Ensure pip is updated
pip3 install daisykit
```
Install on Windows:
```bash
pip3 install daisykit
```
We prepared a Google Colab notebook here for all demo applications for
ease of environment setup. However, due to the limitations of the Colab
environment, we only run the demo with images here. Link to Colab
notebook:
[_https://colab.research.google.com/drive/1LFg3xcoFr3wxuJmn3c4LEJiW2G7oP7F5?usp=sharing_](https://colab.research.google.com/drive/1LFg3xcoFr3wxuJmn3c4LEJiW2G7oP7F5?usp=sharing).
### Face detection flow: Detect faces + landmark
Face detector flow in Daisykit contains a face detection model based on
[_YOLO Fastest_](https://github.com/dog-qiuqiu/Yolo-Fastest) and a
facial landmark detection model based on
[_PFLD_](https://github.com/polarisZhao/PFLD-pytorch). In addition, to
encourage makers to join hands in the fighting with COVID-19, we
selected a face detection model that can recognize people wearing face
masks or not.


Let's see into the source code below to understand how to run this model
with your webcam. First, we initialize the flow with a `config`
dictionary. It contains information about the models used in the flow.
`get_asset_file()` function will automatically download the models
and weights files from
[_https://github.com/Daisykit-AI/daisykit-assets_](https://github.com/Daisykit-AI/daisykit-assets),
so you don't have to care about downloading them manually. The
downloading only happens the first time we use the models. After that,
you can run this code offline. You also can download all files yourself
and put the paths to file in instead of `get_asset_file()`. If you don't need facial landmark output, set
`with_landmark` to `False`.
```python
import cv2
import json
from daisykit.utils import get_asset_file, to_py_type
import daisykit
config = {
"face_detection_model": {
"model": get_asset_file("models/face_detection/yolo_fastest_with_mask/yolo-fastest-opt.param"),
"weights": get_asset_file("models/face_detection/yolo_fastest_with_mask/yolo-fastest-opt.bin"),
"input_width": 320,
"input_height": 320,
"score_threshold": 0.7,
"iou_threshold": 0.5,
"use_gpu": False
},
"with_landmark": True,
"facial_landmark_model": {
"model": get_asset_file("models/facial_landmark/pfld-sim.param"),
"weights": get_asset_file("models/facial_landmark/pfld-sim.bin"),
"input_width": 112,
"input_height": 112,
"use_gpu": False
}
}
face_detector_flow = daisykit.FaceDetectorFlow(json.dumps(config))
# Open video stream from webcam
vid = cv2.VideoCapture(0)
while(True):
# Capture the video frame
ret, frame = vid.read()
frame = cv2.cvtColor(frame, cv2.COLOR_BGR2RGB)
faces = face_detector_flow.Process(frame)
# for face in faces:
# print([face.x, face.y, face.w, face.h,
# face.confidence, face.wearing_mask_prob])
face_detector_flow.DrawResult(frame, faces)
frame = cv2.cvtColor(frame, cv2.COLOR_RGB2BGR)
# Convert faces to Python list of dict
faces = to_py_type(faces)
# Display the resulting frame
cv2.imshow('frame', frame)
# The 'q' button is set as the
# quitting button you may use any
# desired button of your choice
if cv2.waitKey(1) & 0xFF == ord('q'):
break
# After the loop release the cap object
vid.release()
# Destroy all the windows
cv2.destroyAllWindows()
```
All flows in Daisykit are initialized by a configuration string.
Therefore we use **json.dumps()** to convert the config dictionary to a
string. For example, in face detector flow:
```python
face_detector_flow = daisykit.FaceDetectorFlow(json.dumps(config))
```
Run the flow to get detected faces by:
```python
faces = face_detector_flow.Process(frame)
```
You can use the **DrawResult()** method to visualize the result or write
a drawing function yourself. This AI flow can be used in DIY projects
such as [_smart COVID-19
camera_](https://github.com/vietanhdev/smart-face-mask-cam) or
Snap-chat-like camera decorators.
### Human pose detection flow
The human pose detector module contains an SSD-MobileNetV2 body detector
and a ported Google MoveNet model for human keypoints. This module can
be applied in fitness applications and AR games.


**Source code:**
```python
import cv2
import json
from daisykit.utils import get_asset_file, to_py_type
from daisykit import HumanPoseMoveNetFlow
config = {
"person_detection_model": {
"model": get_asset_file("models/human_detection/ssd_mobilenetv2.param"),
"weights": get_asset_file("models/human_detection/ssd_mobilenetv2.bin"),
"input_width": 320,
"input_height": 320,
"use_gpu": False
},
"human_pose_model": {
"model": get_asset_file("models/human_pose_detection/movenet/lightning.param"),
"weights": get_asset_file("models/human_pose_detection/movenet/lightning.bin"),
"input_width": 192,
"input_height": 192,
"use_gpu": False
}
}
human_pose_flow = HumanPoseMoveNetFlow(json.dumps(config))
# Open video stream from webcam
vid = cv2.VideoCapture(0)
while(True):
# Capture the video frame
ret, frame = vid.read()
frame = cv2.cvtColor(frame, cv2.COLOR_BGR2RGB)
poses = human_pose_flow.Process(frame)
human_pose_flow.DrawResult(frame, poses)
frame = cv2.cvtColor(frame, cv2.COLOR_RGB2BGR)
# Convert poses to Python list of dict
poses = to_py_type(poses)
# Display the result frame
cv2.imshow('frame', frame)
# Press 'q' to exit
if cv2.waitKey(1) & 0xFF == ord('q'):
break
```
### Background matting flow
Background matting use only one segmentation model to generate a human
body mask. This mask can figure out which pixels belong to humans and
which belong to the background. This output can be used for background
replacement (like in the Google Meet app). The segmentation model was
taken from [_this
implementation_](https://github.com/nihui/ncnn-webassembly-portrait-segmentation)
by [_nihui_](https://github.com/nihui), the author of the NCNN
framework. The author also has a webpage for a live demo on web
browsers.
[_https://github.com/nihui/ncnn-webassembly-portrait-segmentation_](https://github.com/nihui/ncnn-webassembly-portrait-segmentation).

**Source code:**
```python
import cv2
import json
from daisykit.utils import get_asset_file
from daisykit import BackgroundMattingFlow
config = {
"background_matting_model": {
"model": get_asset_file("models/background_matting/erd/erdnet.param"),
"weights": get_asset_file("models/background_matting/erd/erdnet.bin"),
"input_width": 256,
"input_height": 256,
"use_gpu": False
}
}
# Load background
default_bg_file = get_asset_file("images/background.jpg")
background = cv2.imread(default_bg_file)
background = cv2.cvtColor(background, cv2.COLOR_BGR2RGB)
background_matting_flow = BackgroundMattingFlow(json.dumps(config), background)
# Open video stream from webcam
vid = cv2.VideoCapture(0)
while(True):
# Capture the video frame
ret, frame = vid.read()
image = cv2.cvtColor(frame, cv2.COLOR_BGR2RGB)
mask = background_matting_flow.Process(image)
background_matting_flow.DrawResult(image, mask)
image = cv2.cvtColor(image, cv2.COLOR_RGB2BGR)
# Display the result frame
cv2.imshow('frame', frame)
cv2.imshow('result', image)
# Press 'q' to exit
if cv2.waitKey(1) & 0xFF == ord('q'):
break
```
In the source code, we use `get_asset_file("images/background.jpg")`
to download the default background. You can use another image for the
background by replacing it with a path to an image file.
### Hand pose detection flow
The hand pose detection flow comprises two models: a hand detection
model based on YOLOX and a 3D hand pose detection model released by
Google this November. Thanks to
[_FeiGeChuanShu_](https://github.com/FeiGeChuanShu) for the effort in
early model conversion.

This hand pose flow can be used in AR games, hand gesture control, and
many cool DIY projects.

**Source code:**
```python
import cv2
import json
from daisykit.utils import get_asset_file, to_py_type
from daisykit import HandPoseDetectorFlow
config = {
"hand_detection_model": {
"model": get_asset_file("models/hand_pose/yolox_hand_swish.param"),
"weights": get_asset_file("models/hand_pose/yolox_hand_swish.bin"),
"input_width": 256,
"input_height": 256,
"score_threshold": 0.45,
"iou_threshold": 0.65,
"use_gpu": False
},
"hand_pose_model": {
"model": get_asset_file("models/hand_pose/hand_lite-op.param"),
"weights": get_asset_file("models/hand_pose/hand_lite-op.bin"),
"input_size": 224,
"use_gpu": False
}
}
flow = HandPoseDetectorFlow(json.dumps(config))
# Open video stream from webcam
vid = cv2.VideoCapture(0)
while(True):
# Capture the video frame
ret, frame = vid.read()
frame = cv2.cvtColor(frame, cv2.COLOR_BGR2RGB)
poses = flow.Process(frame)
flow.DrawResult(frame, poses)
frame = cv2.cvtColor(frame, cv2.COLOR_RGB2BGR)
# Convert poses to Python list of dict
poses = to_py_type(poses)
# Display the result frame
cv2.imshow('frame', frame)
# Press 'q' to exit
if cv2.waitKey(1) & 0xFF == ord('q'):
break
```
In the above source code, `input_width` and `input_height` of the
`hand_detection_model` can be adjusted for speed/accuracy trade-off.
### Barcode detection
Barcodes can be used in a wide range of robotics and software
applications. That's why we integrated a barcode reader into Daisykit.
The core algorithms of the barcode reader are from [_the Zxing-CPP
project_](https://github.com/nu-book/zxing-cpp). This barcode processor
can read QR codes and bar codes in different formats.

**Source code:**
```python
import cv2
import json
from daisykit.utils import get_asset_file
from daisykit import BarcodeScannerFlow
config = {
"try_harder": True,
"try_rotate": True
}
barcode_scanner_flow = BarcodeScannerFlow(json.dumps(config))
# Open video stream from webcam
vid = cv2.VideoCapture(0)
while(True):
# Capture the video frame
ret, frame = vid.read()
frame = cv2.cvtColor(frame, cv2.COLOR_BGR2RGB)
result = barcode_scanner_flow.Process(frame, draw=True)
frame = cv2.cvtColor(frame, cv2.COLOR_RGB2BGR)
# Display the result frame
cv2.imshow('frame', frame)
# Press 'q' to exit
if cv2.waitKey(1) & 0xFF == ord('q'):
break
```
### Object detection
A general-purpose object detector based on
[_YOLOX_](https://github.com/Megvii-BaseDetection/YOLOX) is integrated
with Daisykit. The models are trained on the COCO dataset using the
[_official repository of
YOLOX_](https://github.com/Megvii-BaseDetection/YOLOX). You can retrain
the model with your custom dataset and convert it to NCNN format, which
can be integrated into Daisykit easily.

**Source code:**
```python
import cv2
import json
from daisykit.utils import get_asset_file, to_py_type
from daisykit import ObjectDetectorFlow
config = {
"object_detection_model": {
"model": get_asset_file("models/object_detection/yolox-tiny.param"),
"weights": get_asset_file("models/object_detection/yolox-tiny.bin"),
"input_width": 416,
"input_height": 416,
"score_threshold": 0.5,
"iou_threshold": 0.8,
"use_gpu": False,
"class_names": [
"person", "bicycle", "car", "motorcycle", "airplane", "bus", "train", "truck", "boat", "traffic light",
"fire hydrant", "stop sign", "parking meter", "bench", "bird", "cat", "dog", "horse", "sheep", "cow",
"elephant", "bear", "zebra", "giraffe", "backpack", "umbrella", "handbag", "tie", "suitcase", "frisbee",
"skis", "snowboard", "sports ball", "kite", "baseball bat", "baseball glove", "skateboard", "surfboard",
"tennis racket", "bottle", "wine glass", "cup", "fork", "knife", "spoon", "bowl", "banana", "apple",
"sandwich", "orange", "broccoli", "carrot", "hot dog", "pizza", "donut", "cake", "chair", "couch",
"potted plant", "bed", "dining table", "toilet", "tv", "laptop", "mouse", "remote", "keyboard", "cell phone",
"microwave", "oven", "toaster", "sink", "refrigerator", "book", "clock", "vase", "scissors", "teddy bear",
"hair drier", "toothbrush"
]
}
}
flow = ObjectDetectorFlow(json.dumps(config))
# Open video stream from webcam
vid = cv2.VideoCapture(0)
while(True):
# Capture the video frame
ret, frame = vid.read()
frame = cv2.cvtColor(frame, cv2.COLOR_BGR2RGB)
poses = flow.Process(frame)
flow.DrawResult(frame, poses)
frame = cv2.cvtColor(frame, cv2.COLOR_RGB2BGR)
# Convert poses to Python list of dict
poses = to_py_type(poses)
# Display the result frame
cv2.imshow('frame', frame)
# Press 'q' to exit
if cv2.waitKey(1) & 0xFF == ord('q'):
break
```
If you have any difficulty running the examples above, we prepared a
Colab environment to try them without setting up a local environment.
Access our Colab notebook at:
[_https://colab.research.google.com/drive/1LFg3xcoFr3wxuJmn3c4LEJiW2G7oP7F5\#scrollTo=2BLn9OfaQQtM_](https://colab.research.google.com/drive/1LFg3xcoFr3wxuJmn3c4LEJiW2G7oP7F5#scrollTo=2BLn9OfaQQtM)
### 3. Deployment for mobile phone
Besides Python, Daisykit teams also developed Daisykit examples for
mobile phones to cover as many use cases as possible. Access our
repository for Android
[_here_](https://github.com/Daisykit-AI/daisykit-android). We provided
detailed instructions on how to set up and run the project with Android
Studio in the [_README
file_](https://github.com/Daisykit-AI/daisykit-android) with three
steps:
- Clone repository with all submodules
- Download prebuilt OpenCV, NCNN libraries and put them in the right location
- Open the project with Android Studio, build and run examples
There are also six demo flows in the Android example. We integrated all
of them into a single mobile app for convenience.
 ## 4. Conclusion
Although Daisykit is still in an active design and development phase, we
can see some optimistic results from our progress. We will learn from
other frameworks like NVIDIA DeepStreams or Google Mediapipe to improve
Daisykit gradually in terms of model quality and inference speed. In the
future, we also have plans for training source code, tutorials, and a
module for model distribution and monitoring. We understand that there
are still many challenges with Daisykit, but we will try our best to
deliver an AI framework for everyone and help people build their own AI
projects with ease.
We hope that you can see something useful for your next projects here.
We are here to hear from you and support you in applying Daisykit to
your next great ideas. You can also dive into the source code,
architecture by investigating Daisykit repositories:
- **Core SDK, Python, and C++ examples:** [_https://github.com/Daisykit-AI/daisykit_](https://github.com/Daisykit-AI/daisykit)
- **Daisykit Android:** [_https://github.com/Daisykit-AI/daisykit-android_](https://github.com/Daisykit-AI/daisykit-android)
- **Daisykit iOS:** [_https://github.com/Daisykit-AI/daisykit-ios_](https://github.com/Daisykit-AI/daisykit-ios)
## 4. Conclusion
Although Daisykit is still in an active design and development phase, we
can see some optimistic results from our progress. We will learn from
other frameworks like NVIDIA DeepStreams or Google Mediapipe to improve
Daisykit gradually in terms of model quality and inference speed. In the
future, we also have plans for training source code, tutorials, and a
module for model distribution and monitoring. We understand that there
are still many challenges with Daisykit, but we will try our best to
deliver an AI framework for everyone and help people build their own AI
projects with ease.
We hope that you can see something useful for your next projects here.
We are here to hear from you and support you in applying Daisykit to
your next great ideas. You can also dive into the source code,
architecture by investigating Daisykit repositories:
- **Core SDK, Python, and C++ examples:** [_https://github.com/Daisykit-AI/daisykit_](https://github.com/Daisykit-AI/daisykit)
- **Daisykit Android:** [_https://github.com/Daisykit-AI/daisykit-android_](https://github.com/Daisykit-AI/daisykit-android)
- **Daisykit iOS:** [_https://github.com/Daisykit-AI/daisykit-ios_](https://github.com/Daisykit-AI/daisykit-ios)